In the most basic definition, potting soil is meant to be used outside in your flower beds, vegetable gardens or landscaping. Potting mix is a soilless mix of peat, perlite and bark (generally), meant for use indoors with houseplants.
And that’s the end of this article. That was easy. Teehee.
Or not…because unfortunately, many of the producers of potting mix and potting soil do not respect the difference in these names. Some brands, not all, feel no need to label their products accurately. Which means that when you are shopping for one of these items, you will have to be careful. If you are considering a new brand or a new mix, I would recommend basing your choice on two things; weight and ingredients.
#1 – Weight of the Bag – So a super simplified way to make a quick judgement on whether a product is potting mix or potting soil is to pick up the bag. If you compare a similarly sized bag of potting mix to a bag of potting soil, the bag of potting soil is going to be much heavier. No matter what the label calls it.
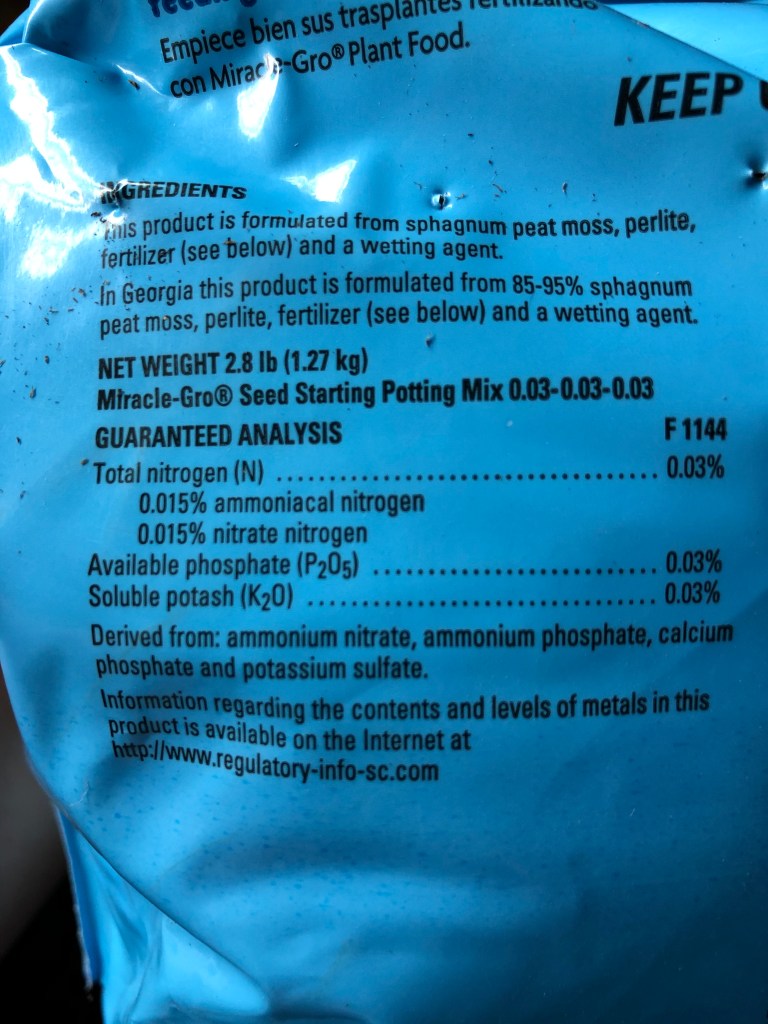
#2 – Read the Contents Label – Going to the contents label is a must if you are buying a potting mix/soil for the first time. It will list exactly what contents are found inside of the bag. Here’s a photo from a seed-starting mix from Miracle-Gro.
After looking at the list of ingredients, you can see that there is no actual soil in this mix and so it is appropriate for use with houseplants and (thankfully) labeled correctly also.
It’s easy to see why plant people find a brand of potting soil or potting mix and then stay loyal to that brand. It can be scary to try new things especially where our beloved plants are concerned. To me, it feels safer to just make up my own potting mixes as opposed to buying a premade potting mix. That way I know absolutely every ingredient that is in my mix and what amount or percentage of each ingredient is included. I suppose you could say it gives me an element of control. If that appeals to you, I’ll include a link here to a blog post with the recipe for my Peace Lily potting mix. Also here is a link to a video for my Peace Lily potting mix.
I do also want to address the potting soil side of this discussion for all those Garden Girls and Garden Guys. I personally don’t tend to be as picky about brands when I need to bring potting soil into my flowerbeds. My vegetable garden, of course, is a completely different story since my family eats from our garden. Either way, a potting mix is not appropriate for an outdoor, in-the-ground plant. Our outdoor plants need to be planted in healthy living soil to thrive. (If you would like to read about what soil really is, I’ll include a link to my soil blog post for you.)
If you’ve enjoyed this content, make sure that you are subscribed to the LGG website. Simply go to the Home page, scroll to the bottom of the page and click the Subscribe button. Thanks for reading and have a great week!
I’ve been aware of the differences between soil and potting mix for at least the last ten years. But I didn’t start hearing the YouTube plant people getting worked up about the nomenclature issue until about the last year or two. I figured it was a good topic to discuss with my planty friends here. (I considered using a flashy catchphrase here referencing “dirty talking”, but I won’t do that to you. Because I like you.)
Let’s talk about soil. One of the crowing glories of our Earth is its soil. It’s what allows us to live. Of course there are other major factors like the sun and our climate, but we won’t discuss those at the moment. Let’s use this simple definition of soil, “The upper layer of the Earth; made up of solids, gases, liquids and organisms; that is capable of supporting life.” Soil scientists (haha yes, that’s a real job…they’re called pedologists) actually consider soil to be a living organism. No two soil samples are alike and yes, soil can die or be killed. It’s simple really. Just take a shovelful of soil out of the ground and fling it onto a paved surface. Within a few days there will be little or no life left in that shovelful. Or even more simply you can spray harmful chemicals on a patch of soil and see the heartbreaking results.
So if this “soil” is so amazing, why does everyone tell me not to use soil to pot up my houseplants? After all, most of my favorite houseplants are native to rainforests where they grow in the soil.
That’s an excellent question. The answer is that soil from the outside does not provide the best possible growing situation for my plants in an inside microclimate. You see, if I bring some soil inside and pot up a plant with it, it won’t be long before I see bugs crawling around in my soil and probably on my plant as well. So my next course of action will be to declare all out war on the insects. Because I paid way too much money for my plant to allow these bugs to use it as a chew toy. Right? But when I rain down the Neem and soak the soil with Hydrogen Peroxide solution, it works. It kills off all the bugs (good and bad) as well as all of the microbes (good and bad) in the soil. If I’ve killed off most or all of the organisms in my soil, it isn’t really soil anymore. Now it’s just dirt.
So, I’ve killed off the insects in my potting soil which will cause the structure of the soil to break down quickly. Each time I water my plant, the soil particles will pack in tighter and tighter, until the roots of my plant are completely compacted in the not-so-living soil. Once the roots are stuck in the compacted soil, they will stop being able take up nutrients and water and will die off. Long story short (too late) actual soil is not at all a good choice for potting up our beloved houseplants.
My next post will be a blog discussing the differences between potting soil and potting mix. Please comment below if this was helpful to you and also if you have any other questions. Let’s build up this houseplant community!
I just spent the last two days wrestling with plant roots straight from the bowels of Hades.
I went into this feeling all confident but things went sideways almost as soon as I got started repotting. You see, my beautiful Agave had been growing in the same pot since I got it. It was a plant I had been wanting for a long while. It was a wish list plant before plant wish lists were really a “thing”. When my hubby heard me talking about this new plant obsession, he skulked off to the computer and ordered it for me as gift for our 17th wedding anniversary. (My husband is a darling and also a bit of a plant enabler too.) So in June of 2017 I became the proud owner of a huge Agave lophantha ‘Quadricolor’. I have a video of the unboxing if you’d like to see it.
After three growing seasons in the same pot, my poor Agave was looking rough. Grass was growing out of the planter, there were dead leaves and brown and broken leaf tips. And approximately 4 million pups that desperately needed to be removed and given their own pots.
My Agave in desperate need of a repotting!
The first problem with repotting an Agave is the incredibly sharp leaf margins and leaf tips. I knew this already and I had protected myself with leather gloves. So my hands and wrists were protected, but I was still having problems unpotting this plant. It’s the strangest thing, the leaves of this Agave are armed like a porcupine, but they are still rather easily damaged. They bend and snap and can be pierced and scratched, sometimes by other leaves from the same plant! So, rolling this plant around in an attempt to loosen it from its pot was just not an option. Additionally, there is no part of this plant that you can grab onto for some leverage. No stem (that can be seen or reached) and the rest is all pointy teeth…hungry for my tender flesh.
The only logical next step was to get a hammer. It took three hits. And then I could see why the plant could not be pulled from the pot.
Wowza! This Agave knows how to pack a pot full of roots and pups!
The pot was packed, way past capacity, with roots and crazy pups. Some of the offsets (pups) wrapped all the way around the inside of the pot. There were at least 50 pups that had not been able to grow out of the top of the pot and so had just spiraled around in the darkness. There was almost no soil at all left. Poor baby. Plant abuse!
I spent the next two days working on gently loosening roots and cutting off pups. All while holding an extremely sharp and heavy plant by its rootball. I was absolutely exhausted! I’d worked for an hour or hour and a half at a time and then break for a couple of hours and go back for more. As I said, it was a long couple of days. Many tears were shed, quite a bit of blood too, and the curse words got fantastically creative. I’m afraid I offended the poor pig’s ears.
Piggy was witness to some pretty entertaining language during the Agave wrestling match.
I got it done. That’s all I can really say here. I can’t brag that it was a job well done, that’s for sure. But my beautiful wish list plant has been successfully repotted so no complaints here. As a bonus, I have many sweet Agave babies.
I have removed and grown many offsets from this Agave. It’s a fairly prolific mama plant.
And if you still want an Agave lophantha ‘Quadricolor’ after reading all of this, well, I have them listed for sale in my Etsy shop. (I’m not at all surprised, by the way. I mean, we’re all crazy plant people here…right???)
Here’s a link to my YouTube video of this experience.
She’s a beast for sure! I have been caring for this plant for 3 years now and she captures my interest still. Which is saying something because I have a track record for getting bored with plants and selling them off without a backwards glance. (Poor babies.) What can I say? I’m a girl who knows what she likes.
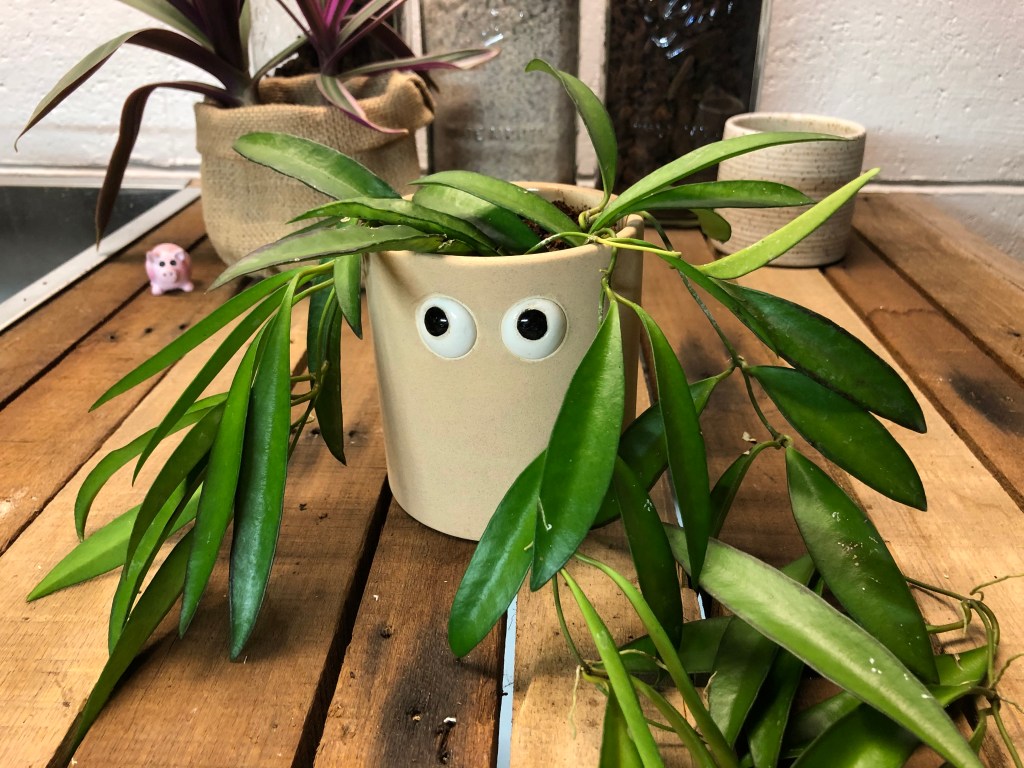
Seriously…isn’t this Hoya gorgeous?!?
But before I go convincing you that you need one of these Hoyas too, I do want to make a confession…no blooms in three years. Three. Years. People!
But that doesn’t mean that I don’t love her, I do. Those pretty crinkled leaves are so fascinating to sit down and really study. Gazing at those long squid-looking tentacles back lit by one of my East facing windows…well…it’s pure joy. Even without those lovely pink blooms this plant is a worthwhile one in my humble opinion.
Moving forward, what should I do to increase the chances that I will have blooms this year?
I’ve already increased humidity in that corner of my house and I think that will make a big difference. (I use the Cadillac of humidifiers, the Levoit humidifier, and highly recommend it if you are shopping for one.) There is another Hoya growing there also, a Hoya bilobata (A.K.A. Hoya DS-70) and I’m hopeful that it will consider blooming for me this coming year also. So increased humidity is Step #1.
For Step #2 I am planning to feed my Hoya plants a little bit heavier than I have in the past. I plan to topdress with worm castings as well as using a liquid fertilizer at half strength for every watering. Every year, I begin fertilizing on March 1 because that is the official “Go Time” for my houseplants. In other words, that’s when they are waking up and coming out of their winter resting state.
I don’t have to do this next step because my Hoyas are already enjoying loads of bright light, but Step #3 is increase light levels for your Hoya.
That’s it! That’s the plan. I’m hopeful! Also, if you have any advice that has helped you encourage your Hoyas to flower, please, please, please share it with us in the comments. After all, we are all in this plant thing together. Right?
I feel a little anxiety about sharing Hoya advice and experience with others because most of us (Hoya lovers) are as passionate as complete zealots about our Hoyas. All I can do is share my own experiences, my successes and failures, and let you decide which pieces and parts you would like to take and use for yourselves. With that in mind, this is the potting mix I make for my Hoya plants. Also, see the very bottom of this article for the whole recipe in one location.
The base of this potting mix is orchid bark because (I’m sure you already know) Hoyas grow in nature as epiphytes, living on trees and other plants. They love to have bark in their roots. I love the Orchiata company that produces this Pine bark from New Zealand. It is grown and harvested responsibly which is really important to me. I start by filling a bowl with different sizes of orchid bark. If you like a chunkier mix, use larger pieces of bark. Smaller pieces if you prefer a finer mix. I tend to like a slightly finer mix and so I use the small and medium bark sizes. The percentage of orchid bark in the total mix should be about 50%.
Coco coir is the next ingredient in this recipe. If you have used Coco coir before, then you know that it’s very thirsty when it comes out of its packaging. If you haven’t used it before…well…get ready! It’s terribly fun. Like a crazy science experiment. It’s incredibly absorbent! I like to start with the coir in a separate bowl so that I can let it absorb a lot of water. Add it to the orchid bark at a percentage of about 20%.
Next up, of course, is some perlite. I love the brand that I use but you can use any kind or size of perlite that you like. I add about 20% perlite to this mix.
The fourth ingredient in this mix is horticultural charcoal. Please be sure to use charcoal that is horticultural grade. I tend to add charcoal to most of my potting mix recipes because it removes impurities from the soil. It also can help to prevent any gross smells that can happen in potting mixes too. I add about 5% charcoal to this mix to keep everything fresh.
Last to be added is worm castings. Yes, it’s poop. But it’s a fantastic gentle fertilizer and I add it to most of my potting mixes. I even add it when it’s fall or winter and I’m not actually fertilizing my plants as part of watering routine so don’t be afraid to add it. If you are opposed to using worm castings, you can just leave them out of this recipe entirely.
If you would like to see me mix this recipe on YouTube, here is the link to my video.
So, this is it! I have used it with all of my Hoyas and I haven’t killed one yet. Best of luck, my friends.
This post is being aimed at beginner plant mamas and papas as a tutorial. But it’s also meant to encourage those experienced plant parents. Complete newbie or professional grower, let me give you a reminder that Fall is the time of year when our houseplants will struggle a bit and start showing us signs of displeasure (ie. an occasional yellow leaf) with the cooler temperatures and shorter daylight hours. No worries, your plant is okay.
It’s okay, my friends!
Death of older leaves is inevitable. But when that yellow leaf is dying off of your most cherished and horrifyingly expensive Philodendron…it feels like time to panic. It’s difficult to live through. I get it.
So consider the problems/causes of this leaf loss; less daylight, less intensity of light, heaters inside and cooler temperatures outside; and try to make adjustments to help your plant babies accordingly.
To help with lighting:
Move plants to locations that have more windows or brighter windows. West and South windows that might not be appropriate during the hotter months, may be the perfect location through the Fall and Winter since they will provide the most light exposure.
If you have limited window real estate, consider investing in a grow light. Or if you’re living in a jungle, like me, maybe multiple grow lights. (The grow lights that I use are not necessarily for the plants in your living room because of size. But they work! (Affiliate link.)) Group your plants so that the plants with higher light needs are placed closer to the bright windows and/or growlights. Grouping your plants together also benefits them in the humidity department which we will talk about next. Let me offer one caution for the moving of plants to brighter locations whether they be natural or artificial light locations. Transition your plants to their new brighter locations the same way you harden off seedlings before planting them out in the garden. In other words, introduce them slowly to their brighter spots, taking several days of moving them closer and closer to their new bright light. This will prevent leaf burn. No one wants burnt leaves.
In the Summer months, your plants probably enjoy plenty of humidity. The fall and winter however, bring blowing wind that strips humidity right out of the air. And to compound the issue, we humans are heating our homes which plummets the inside humidity levels to 40%, 30% and sometimes even lower. Our foliage plants will certainly lose leaves if subjected to these low humidity levels. (Just an FYI – If you keep succulent plants and cacti, these lower humidity levels do not present an issue.)
To help with humidity:
Consider investing in a hygrometer. They are right around $10 and can be found at Amazon (here is an affiliate link to the one I own multiples of), Lowe’s or Home Depot. Probably many other places as well, but that’s where I buy mine. Another thing that I like about having hygrometers is that they show the highest and lowest humidity levels from the last 24 hours. I find that to be really helpful.
Another obvious help is a good quality humidifier. And no, not all humidifiers are created equally. There are very few humidifiers that will do the job better than the fabulous, fantastic, unstoppable Levoit humidifiers. I use two different Levoit humidifiers and I will include links for both in this and the next paragraph. The smaller Levoit humidifier holds just over a gallon of water and gives you the control to set the desired percentage of humidity you want it to maintain. I love, love, love this humidifier! It is possible to clean every part of the humidifier inside and out which is almost never the case with other humidifiers. It’s really important!
The larger Levoit humidifier is capable of holding just over 1.5 gallons of water! This one also allows you to set the percentage of humidity that you would like the humidifier to maintain. It is also possible to clean every part of this humidifier inside and out. As an added bonus, this humidifier can handle a larger space. Also it gives you the option to have warm or cool mist. So even though it’s price tag is pretty steep, it may be the best investment for your plants.
Finally, to help with humidity, you should consider moving your plants away from any heat sources. This will help to prevent excess drying of your plant’s leaves. This also applies to the parents of succulent and cacti plants. They do need to stay warm though the colder months, but being super close to a heat source will also cause harm. Just think of a place where you would feel comfortable and that should be perfect for your plant. Sitting your bottom directly on a stove or heater vent…probably not a cozy option. Assume your plant won’t appreciate it either.
The very last thing we must change in the cooler months is the amount of water and frequency of watering our houseplants. I want to caution that this is for the majority of houseplants, but there are a few exceptions that do their active growing in fall and winter. But that topic is for a different blog. Most of our plants will not be photosynthesizing very actively because of lower light levels and cooler temperatures. If the plant is not photosynthesizing as actively, the plant does not want/need as much water.
To help with watering:
Consider using a something other than your finger to measure moisture in your plant’s soil. Our fingers aren’t always an accurate indication of moisture. I use a moisture meter for most of my plants. Especially for my most precious plants. You know what I mean, right? Another tool that I love to use, especially on my most favorite plants, is a moisture sensor. My favorite moisture sensors are these by the Sustee company. They show blue when your plant is sufficiently watered and fade to white when the soil has dried out completely. So you can water again based on your plant’s needs; if it’s a Calathea, you water when it’s a pale blue, a succulent wouldn’t need more water until it becomes white or almost white. Also these moisture sensors come in small, medium and large sizes so that you can make sure that the moisture levels are being measured accurately in the root zone.
Don’t be afraid when you see that your plants aren’t needing to be watered weekly. They are slowing their growth, not putting out tons of new growth and therefore do not need nearly as much water. Trust your moisture meter and moisture sensors and only give water when it is needed. Your plants will thank you!
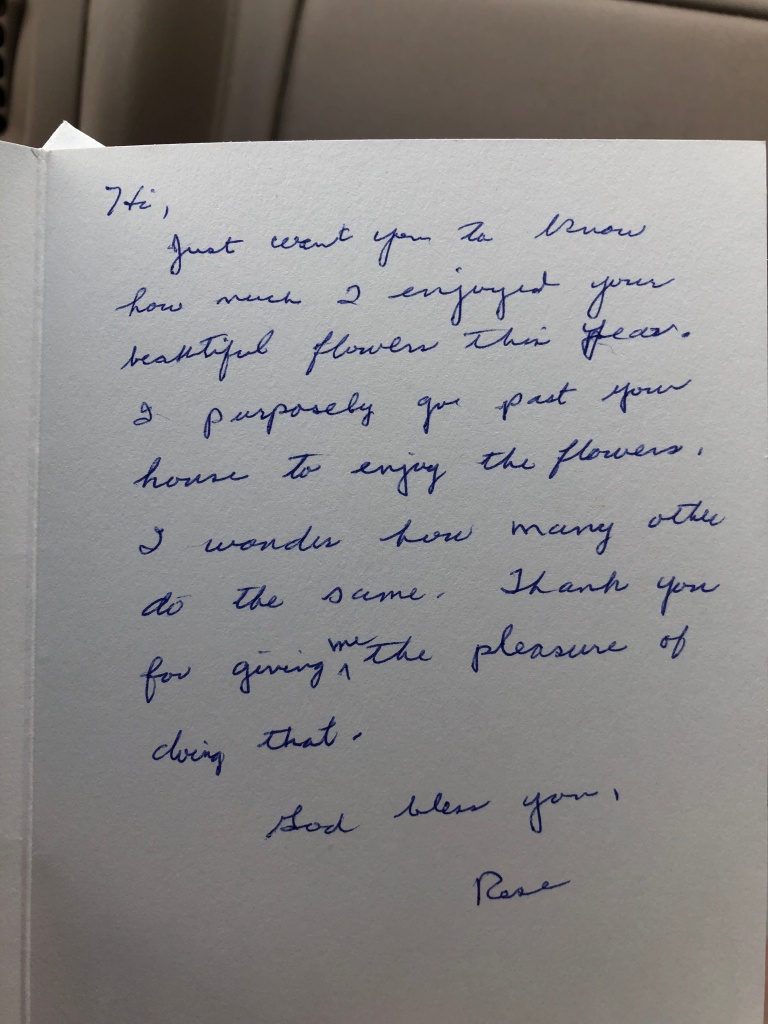
A few weeks ago I received a letter in the mail addressed to “Person with Beautiful Flowers”. I won’t rewrite it here, but what I can tell you is it was one of the kindest gestures I’ve ever experienced. A sweet woman, that I’ve never met in my life, sent me a letter telling me that she purposefully drove past my house to see my flowers.
I know she must be a plant person because only another plant lover would appreciate the effort and dedication it takes to keep annual flowers looking good for the entire growing season.
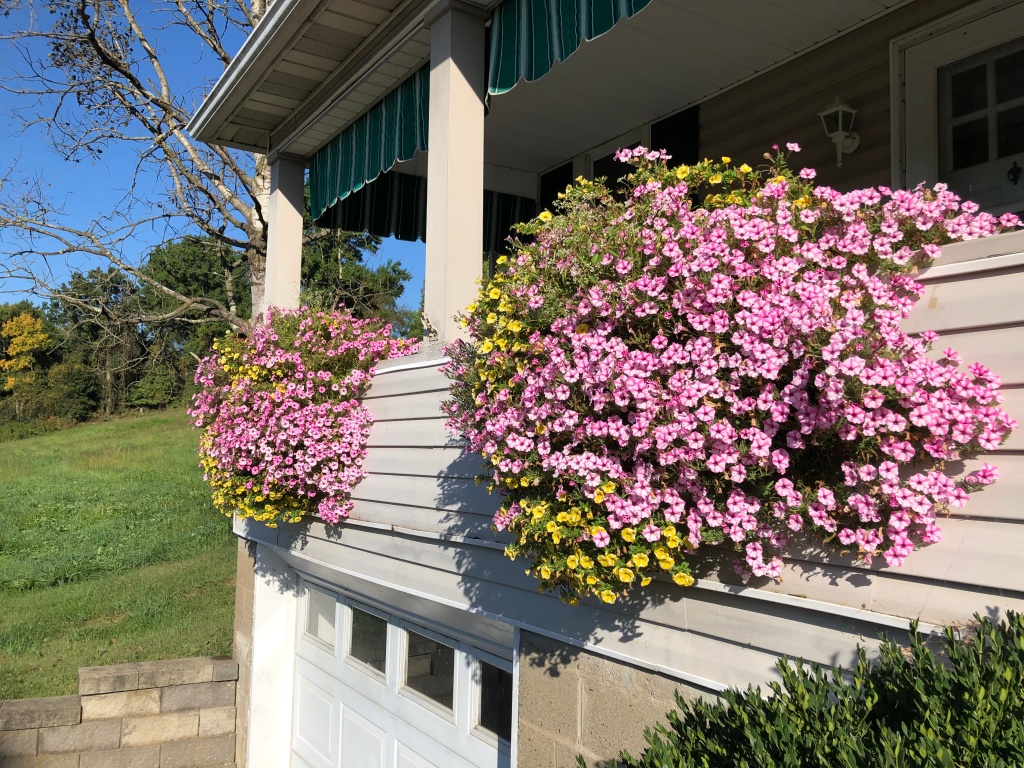
And they were glorious, my friends. Non-stop beautiful colors that just kept spilling further down the front of our porch.
I have three hayrack planters across our front porch.
That kindness really meant a lot. After all, we do plant flowers to bring beauty to our homes; for everyone who sees our homes to appreciate. So I guess that’s mission accomplished.
Today is the day that I’m finally going to remove my flowers. Honestly, they are still looking pretty good. But it’s been a long season and they are reaching their limit. I don’t want to leave them out looking tired and stressed. It will be sad and the front of our house will certainly look pretty bare without them.
Now I get to plan what plants I will use next year (I’m actually grinning like a crazy person at the thought.)
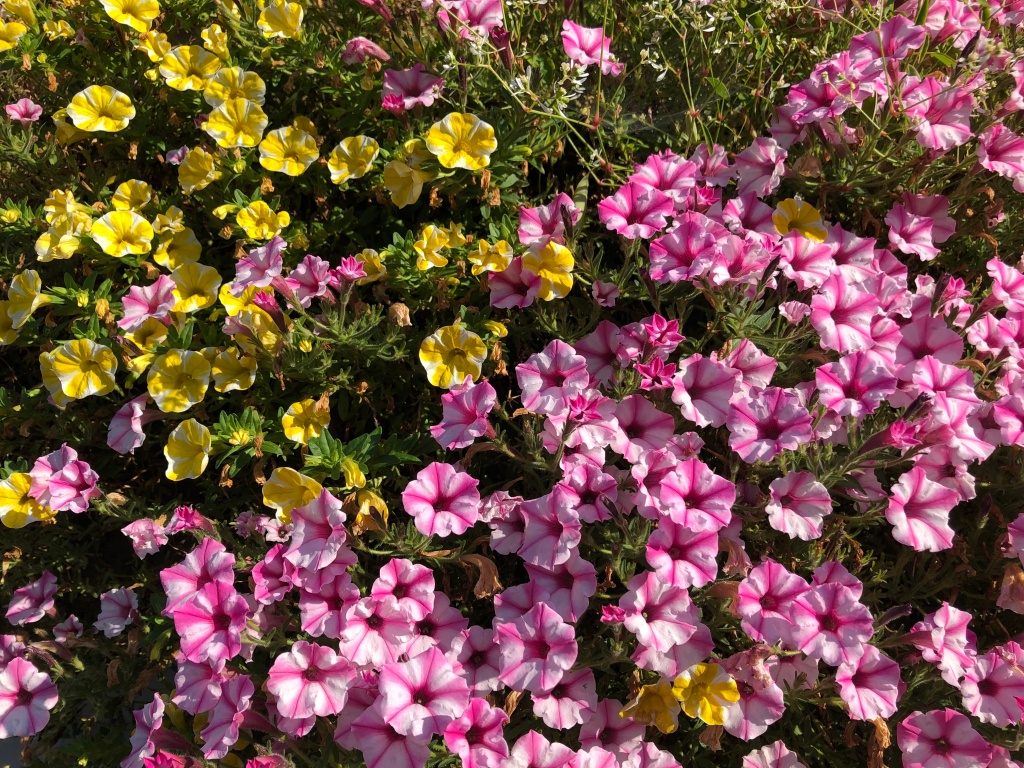
Our house sits really close to a busy intersection with a stop sign right in front. So I felt like my flowers should be looking good for the whole season.This soft colors combination of petunias and million bells was my favorite.
Would you be interested to know what steps I took to keep my flowers looking great all season? Would you like to know which flowers I used? Comment and let me know!
This past summer, in the plant world, there was this whole thing about how a mature form Cebu Blue Pothos plant looks shockingly similar to a Rhaphidophora tetrasperma. And because Rhaphis are so sought after, it was inevitable that plant shops would start selling Cebu Blue Pothos (in mature form) as Rhaphis.
Of course, my question is, “Honest mistake or straight deceit?”
So that brings me to my own experience with this question. I just this week received a plant labeled as a Rhaphidophora. Only I’m having some serious doubts as to its authenticity as a Rhaphi. And I wish that the answer was an easy one. Unfortunately for me, Rhaphis belong to the Aroid family, many members of which take drastically different forms as juvenile plants as compared to their mature plant form.
You may know from my previous blog that I already own a Rhaphidophora. I bought this new one from a different online plant shop. And they do not look like each other. At all…
They have differently colored leaves; one blueish and one a much deeper green. The new plant has longer, narrower leaves. The OG plant has heart shaped leaves with deep fenestrations. Could this just be the difference between a juvenile and mature form of the same plant?
Yes. The answer is yes.
But could this also be two completely different genera of plants?
Yes. The answer is yes. (Insert several minutes here for me to bang my head against the wall.) Yes, the two plants (mature form Cebu Blue Pothos and Rhaphidophora) look remarkably similar. The really super unfortunate thing is that I have paid a lot of money (for me) for both of these plants. And the thought of some devious vendor selling me a Pothos plant, even a Cebu Blue Pothos plant, at a Rhaphidophora tetrasperma price makes my blood boil.
So, my friends, I’d love to have your help and input with this issue! I’ve included a link to a video I posted earlier today on my YouTube that shows both of the plants so you can see them together. Help me! Please!
Do you have one? A unicorn plant? Mine is the lovely Rhaphidophora tetrasperma. It’s the stuff of dreams. No, I literally have dreams about this plant. I could spend half of my day in my favorite planty corner of the house and just stroke its smooth leaves.
Am I being inappropriate?
I bet you have a plant like that in your collection. Or maybe, you have a plant that you are desperately wanting but cannot find. That was my Rhaphidophora for me.
I blame Instagram. That’s where I started seeing this unicorn in my feed and decided that I must own one. But try to find one for sale. It ain’t too easy, my friend. It seemed like every time I’d find a Rhaph for sale, it would be marked as sold out. Or it was from a vendor that was outside of the United States. Knowing that this plant is notoriously bad at shipping and pretty pricey as well, I wasn’t willing to risk it. So I went for the next year and a half searching the internet high and low, with zero success. Nothing. For a year and a half. I figured that I’d never be able to check this plant off my list.
Even worse was when I started buying from disreputable Etsy vendors out of pure desperation. I figured I’d try anyway. Talk about heart-break. When I finally started getting plants in the mail they were either completely rotted or had lost all of their leaves. So I obviously attempted to grow out stem cuttings only to experience further heartbreak when the cuttings all slowly rotted and died.
But don’t despair, friends! I did get a Rhaph not too long ago from a reputable plant seller and, so far, it is still living!!!
My (still living) Rhaphidophora tetrasperma!!!
And don’t think that this plant didn’t struggle as well because she did. I unboxed her to find yellowing patches on the leaves and my heart sank straight into my shoes. I’ve had to treat the leaves with a gentle Hydrogen peroxide solution (several times) and I broke my “I never repot my plants until they are properly acclimated” rule on day number 2. But it’s been several weeks and things seem to be going well. Fingers crossed!
Feel free to comment below if you have had a terrible time finding a plant or just keeping it alive after rough shipping circumstances. I’d love to commiserate with you!
As soon as people find out that I sell houseplants, I am usually asked the same handful of questions. One of those questions is almost always, “Can you help me save my Peace Lily?” (Or something along those lines.) So I figured I’d start my plant blogging journey with some help for all those Peace Lily parents out there. And since one of the most frequent questions I get about Peace Lilies is, “What type of soil should I use for my Peace Lily?” I figure that’s a great place to start. (Head to the very bottom of this article for the simple percentages of this potting mix recipe.)
One of the most important things to know about Spathiphyllum (that’s the scientific name of a Peace Lily) is that their root systems are very sensitive and can be burned by any potting mixes that have fertilizer already mixed in them. Now, I’m not saying that your plant will die if you use these types of potting mixes. They most likely won’t. But I will tell you that they will not be very happy and you will be running the risk of root damage and all the bad things that can follow. I don’t want your plant to be unhappy and most likely, you don’t either!
So let’s get to the recipe! You will need Coco Coir, Perlite, horticultural/Orchid Bark, horticultural Charcoal and Worm Castings. Yum! (I don’t know why, but as I typed the word “recipe” and then the words “Worm Castings” I just got this gag reflex thing going. Teehee.) I will include an affiliate link with each of these items in case you are interested in the specific brands that I use.
Begin with the Coco Coir. If you buy this in a block or brick, you will need to add water. It’s really cool like a science experiment! The Coir will absorb a LOT of water. Start with a small amount and you can add more as needed. The Coir will equal about 50% of the potting mix.
Next is the Perlite. This is an important step because the perlite will help prevent the coir from compacting around the roots of your plant. I generally add about 25% perlite. Is this an exact science? No. In fact I feel a little like a mad scientist when I am stirring up my potting mixes.
Orchid Bark comes next at about 15% of the mix. As you can assume from its name, orchid bark is used as a potting medium for orchids. We will be using it to add even more oxygen to the root zone of our Peace Lily. The bark pieces will trap oxygen near the root zone, they will prevent the potting mix from compacting around the roots and will also provide nutrients to the soil as the pieces of bark begin to break down.
Almost done! Next we will add approx. 5% horticultural Charcoal. Yes, it is important to use a charcoal product that is listed as horticultural. I add charcoal to my potting mixes when I know that the soil will be kept pretty moist. Charcoal works to remove impurities from the potting mix and also keeps it from smelling yucky.
Last, we will add in the Worm Castings at 5%. (In case you were wondering, worm castings is a nice way to say worm poopy.) Remember back in the first paragraph when I told you that Peace Lilies have roots that are sensitive to fertilizers? Well, worm castings are a gentle, yet effective way to give your plant a boost of nutrients. Also, I have found that some people are strongly opposed to using worm castings because they are essentially an animal byproduct. If you feel strongly against using worm castings, just leave that ingredient out of your potting mix. And yes, your potting mix recipe will only equal 95%.
Mix these ingredients well and you are all set to repot your beloved Peace Lily. If you would like to see this in a video format, click the link and it will take you to my YouTube video.
If you have read through this recipe and don’t feel like you can do this mix, let me recommend a potting mix that you can purchase ready-made. (Even though this potting mix is a really good one, I would still add more perlite. But that’s entirely up to you.) The Fox Farms Bush Doctor Coco Loco potting mix is a great choice. It uses coco coir as its base and not peat moss which is very important in my opinion.
I am aware that many of you who are looking for care tips for a Peace Lily are doing so because you have received this plant upon the death of a loved one. I want you to know that I take that knowledge very seriously, my friends! I do understand what a plant can do for someone who has lost a beloved family member or friend. I have used this mix for the last two years on my own plants with great success. I wish you all the best with your plant!
Mercy, peace and love be multiplied to you.
Products I use and (therefore) recommend:
Planty friends – Feel free to use these links to the products that I use for my houseplants. I receive a small percentage of any sales through these links, so feel free not to use them if that bothers you.
Full disclosure – the last three product links will be much cheaper if you can find them in your local garden center. I’ve put them here so that you can see what they are called and what they look like, but I’d advise that you buy from these links only as a last resort.