This blog is a comparison of my two Rhaphidophora tetrasperma plants – one is a tissue culture Rhaphi and the other began its life as a stem cutting.
If you’ve been reading my blogs for a while you may remember an article I posted a year ago, questioning if I’d paid (a very handsome sum) for a Rhaphidophora but received a different plant. I had thought this because I had purchased a Rhaphi from a different vendor and the two plants just did not look very similar. (Here’s a link to that blog Rhaphidophora or Cebu Blue Pothos???).
It turned out that I did have two Rhaphis, but most of the plant world had not yet discovered the existence of “tissue culture Rhaphidophoras”. Here is a photo from October 2019 of the two plants next to each other.
On the left is TC Rhaphidophora and on the right is the stem cutting Rhaphidophora in October of 2019.
It’s fun to look back almost exactly a year. They were so little! Now it’s almost impossible to get a decent photo of either of these plants because I can’t get them in frame.
But let’s get back on track. A year after this photo was taken, the saga continues. My Rhaphis are continuing to act very differently from one another most especially in the way they are growing.
The tissue culture Rhaphidophora is massive, reaching up higher with each passing month. It has already outgrown the bamboo poles (in a tripod shape) I gave it when repotting a few months back. They are 4 foot poles and I guess I’m going to have to trade them in for some 6 foot poles. The leaves are still rather small but most of them have some fenestrations. See photo below.
The tissue culture Rhaphidophora – one year later.
In an attempt to make this plant look fuller, I have taken two stem cuttings and added them back in to the planter where they rooted and have begun growing.
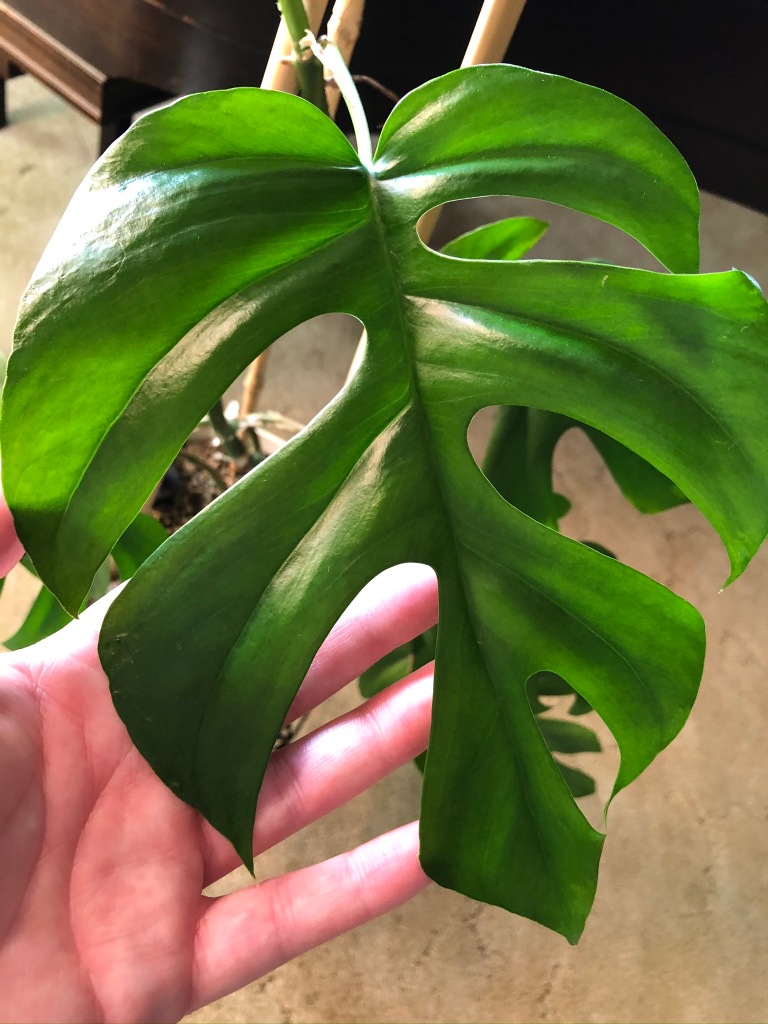
My stem cutting Rhaphidophora has been rather a different story altogether. It is still barely reaching my waist and sits on a plant stand. So, no crazy growth story here. But…let me show you the size of the leaves it has been growing recently…
My rather large man-hand is looking small compared to these huge new leaves.
Oddly, they have been given almost identical growing conditions. Both are growing in Lechuza pon (a semi-hydro growing medium) and both are planted in Lechuza self-watering pots. They are in the same room, receiving very similar light. The only difference in light is that the stem cutting Rhaphi is fairly close to my Milsbo greenhouse cabinet and is probably enjoying some supplemental light from the grow lights in the cabinet. Here’s a photo of the full plant.
Not many leaves at all…but the ones she has are aaaahhhmazing!
I suppose the Rhaphidophora Rule in my household is, “Grow many small leaves or just a few massive ones. But not both.”
My planty friend, Michele Jones, pointed out to me that many plants grow very differently under the same growing conditions. Even some that are “sibling” plants taken from the same parent plants. And she’s absolutely correct. The differences I am observing in my house may have nothing at all to do with whether these plants began their lives as tissue culture or stem cutting plants. What do you think? (I’d love to hear your opinions, so be sure to comment under this article.)
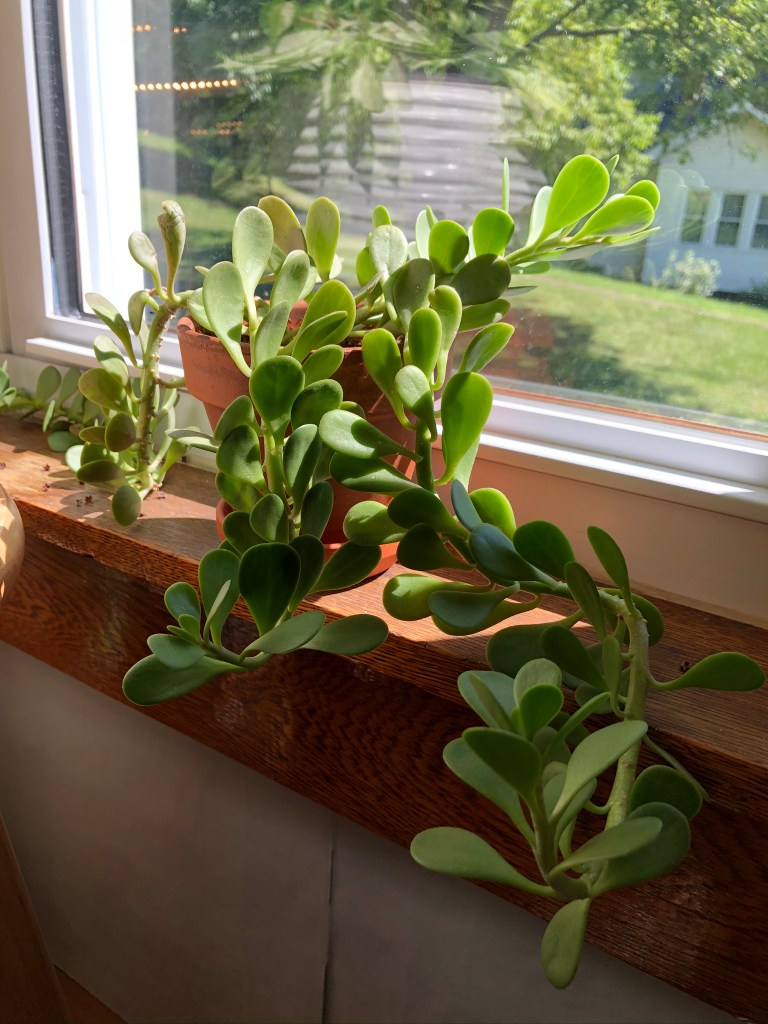
Here is my Trailing Jade plant. Isn’t it gorgeous?
My pretty Trailing Jade plant
Last week, my husband accidentally knocked it off of the piano where it was sitting. For the record, it was an accident, but no one bothered to tell me about it. I discovered my plant in a pile of sad broken pieces while going around the house watering my plants.
One of the broken pieces of my poor plant.
Don’t worry, friends, we are still married. Ha. We didn’t even have an argument actually (but there may have been some strong words about trying to hide the disaster from me.) You see, this really isn’t a difficult fix for my plant.
Unfortunately, my plant isn’t going to be a glorious Rapunzel beauty for at least another couple of years. (Sigh.)
As a matter of fact, I don’t know how old this plant is. I do know that it made the move with us from our former house and so it is, at minimum, three years old. (We moved at the beginning of the 2018 growing season and it is currently the end of the 2020 growing season.) It’s possible that I’ve had it even a year or two longer than that, but I can’t be sure.
Let’s just get out the scissors. Because that’s how we’re going to fix this issue.
Make sure to cut between nodes, as that is where the new roots will grow.
I am not using just any old scissors here, these are actually bonsai scissors that I use when I’m cutting up plants that have a small internodal space. If you look carefully at the photo above, you can see that I have removed a leaf just to the left of where I am cutting. It just looks like a green bump. I am carefully cutting below that “node” and right above a leaf. So each of my new cuttings will have three leaves and a node (where there had been a leaf, but I snapped it off. So that roots could grow from it.) Does that make sense to you? I hope so! It’s terribly simple really. Succulent plants are just so easy to propagate.
To answer your question, no, not all of the stems of my plant were broken. But I am going to cut back all of the super long stems so that my plant doesn’t look awkward or unbalanced. Also, I figure that since I’m going to be making new baby Trailing Jade plants, I may as well make several new baby Trailing Jade plants.
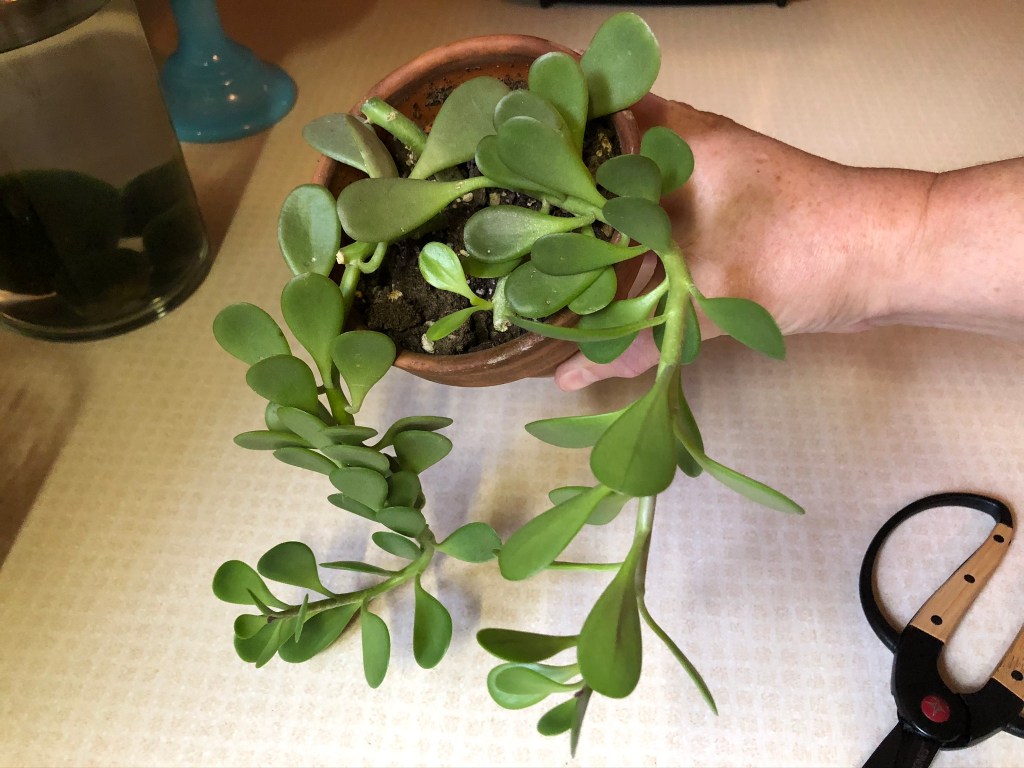
Here is what the original plant looks like now.
Such a sad day 😦
I have placed my cuttings directly in a succulent potting mix. I did not use any rooting hormone or cinnamon on the cut ends. I also did not wait for the ends to callous over first. Because I’m a mom. And I have things to do. But you can use those things if you’d like. I’ve been doing this for years and truly, they really don’t make a whole lot of difference. I’d tell you if they did, I promise I would!
My new little plants will root in pretty quickly and before you know it, I’ll have loads of new baby plants. So here are the pieces of my plant that I started with…
And here are all the new baby plants that I’ve made from those pieces…
They already look pretty good. Once they begin growing and filling out? They’re gonna look amazing. I can’t wait. If you follow me on Instagram (here’s my Instagram page) I’ll post in my stories when these babies are for sale. Here’s the link to my Etsy store (Matilda and Clementine) if you’d like to see what planty goodies I currently have listed for sale.
If you’d be interested, I could write a blog about how to care for a Trailing Jade plant. If that sounds like content that you’d enjoy, make sure to comment below this blog.
Also, please don’t forget to like any of these blogs that have helped you (because that helps me). Also make sure that you have subscribed to this website so that you don’t miss any new content. Simply head to the bottom of the Home page of this website, click the Subscribe button and type in your email address. You don’t want to miss out, right?
Thanks so much for reading. And lastly, take care of each other. And take care of yourselves too.
Some or all of the links in this article may be affiliate.
Are you one of our members? I hope not because it means you may be feeling sad and most likely inadequate too. But if you are one of our sad members, maybe this blog will offer you some hope. And help.
Let me be honest…writing this blog has left me feeling super vulnerable. Because when I say I’m president of the yellow leaf club, it’s no exaggeration, my friends. I have yellow leaves popping up All. Over. My. House.
It’s happening to different genera of plants in all different locations in my house. Without checking any of them too closely yet, it looks like a few of them are not too serious and a couple of them…well…(insert wailing and screaming.)
It’s 100% my fault because I’ve been completely neglecting my houseplants recently. Every year during harvest, I become an absentee [fill in the blank] wife, mom, friend, dog mom & plant parent. This year the added distress of sending my teacher hubby and two children into a school while COVID-19 runs rampant through our country has me losing sleep. The result has been a flagrant neglect of my poor houseplant babies.
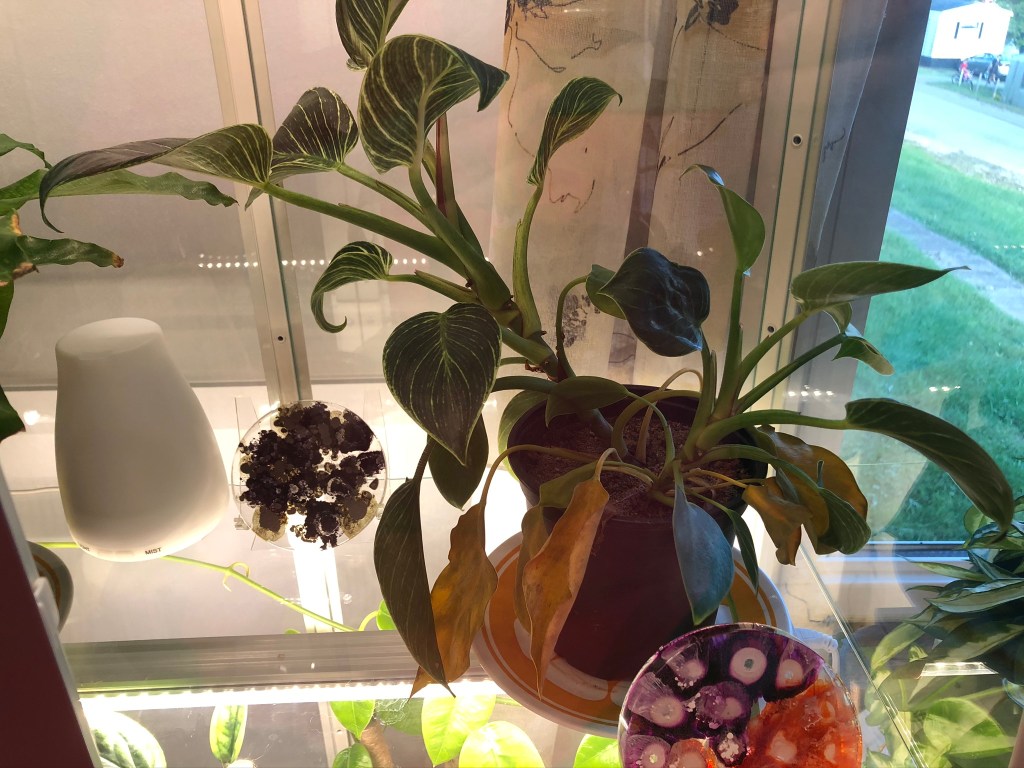
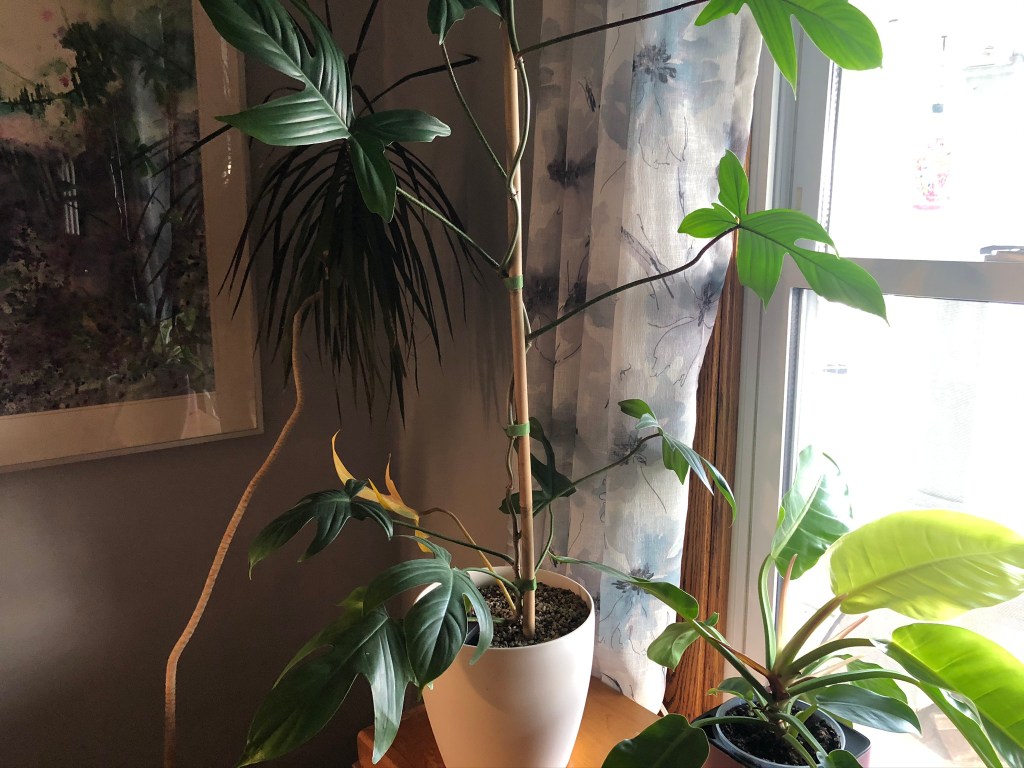
The two plants that I’m most concerned about are my Philodendron Birkin and my Hoya callistophylla. I’m pretty sure that we’re dealing with root rot. Ugh. Let me show you what I’m dealing with here.
My desperately sad looking Philodendron Birkin
To check the root system of this P. birkin, I took it to my potting bench and gently teased the potting mix away from the roots. Thankfully, the roots were all healthy looking so I repotted with fresh potting mix and removed all of the dead and dying leaves.
One possibility for this sudden and extreme leaf drop could have been the plant having a bit of a hissy fit because of its recent move to a new location. This is my best guess. One other possibility is that some of the leaves could have been burnt by the sun coming through the window next to the cabinet. But I think that burn damage would have been more patchy; damaging only parts of the leaf instead of the whole.
It’s been three or so weeks since I repotted and no more yellow leaves. I’m hopeful that the damage was just the plant demonstrating its displeasure at being moved. I’ll keep you updated either way.
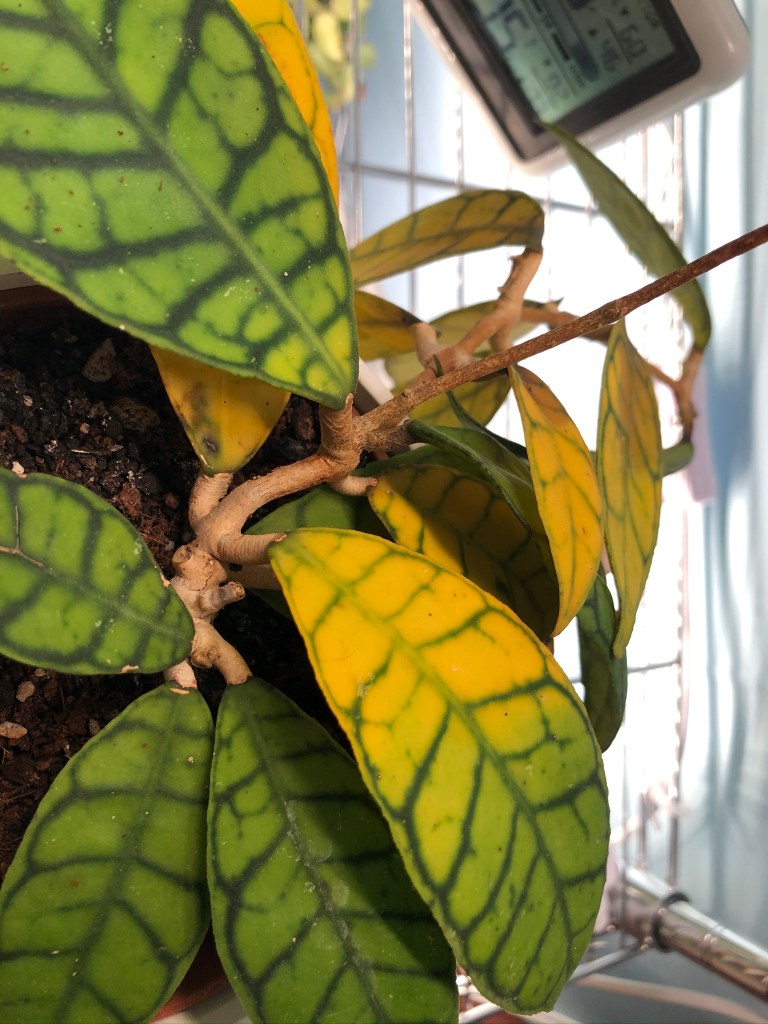
My Hoya callistophylla may be in some serious trouble, let me show you…
Hoya callistophylla looking like a doomed plant.
My Hoya callistophylla went from just fine to almost completely dead in matter of a few days. As the leaves began to yellow, it became obvious that I was dealing with a fungal infection. As I looked even closer, I realized that this Hoya’s leaves had been directly in the path of the humidifier which sits right next to this shelf.
I did a process similar to the P. birkin, repotting after checking the roots for rot (there was none) and removing the dead and dying leaves. I did also spray down the few remaining leaves with a hydrogen peroxide and water solution to discourage any further fungus growth. I also moved this plant to a new spot away from the path of my humidifier.
Three weeks later, I did lose one more leaf leaving only four leaves on the poor plant. I feel like maybe we’ve turned the corner now and I’m hoping that she’ll be willing and able to put out an additional leaf or two before the winter temperatures put a stop to all Hoya growth.
Here are a few of my other yellow leaf club members.
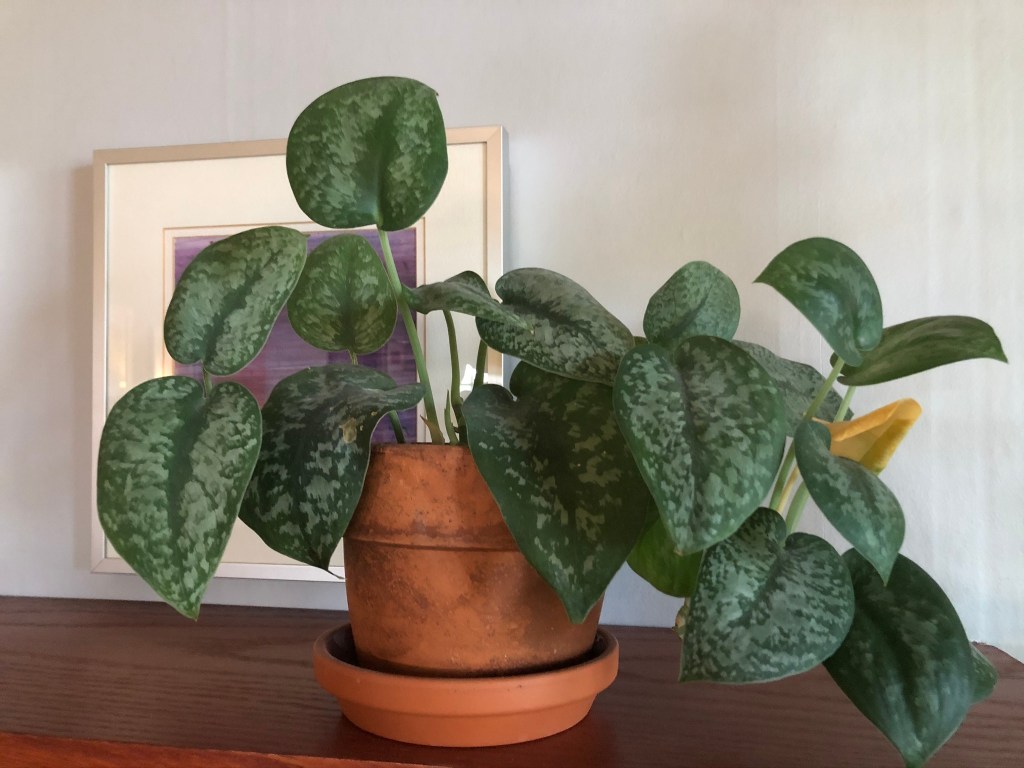
Scindapsus pictus ‘Exotica’ with a yellow leaf
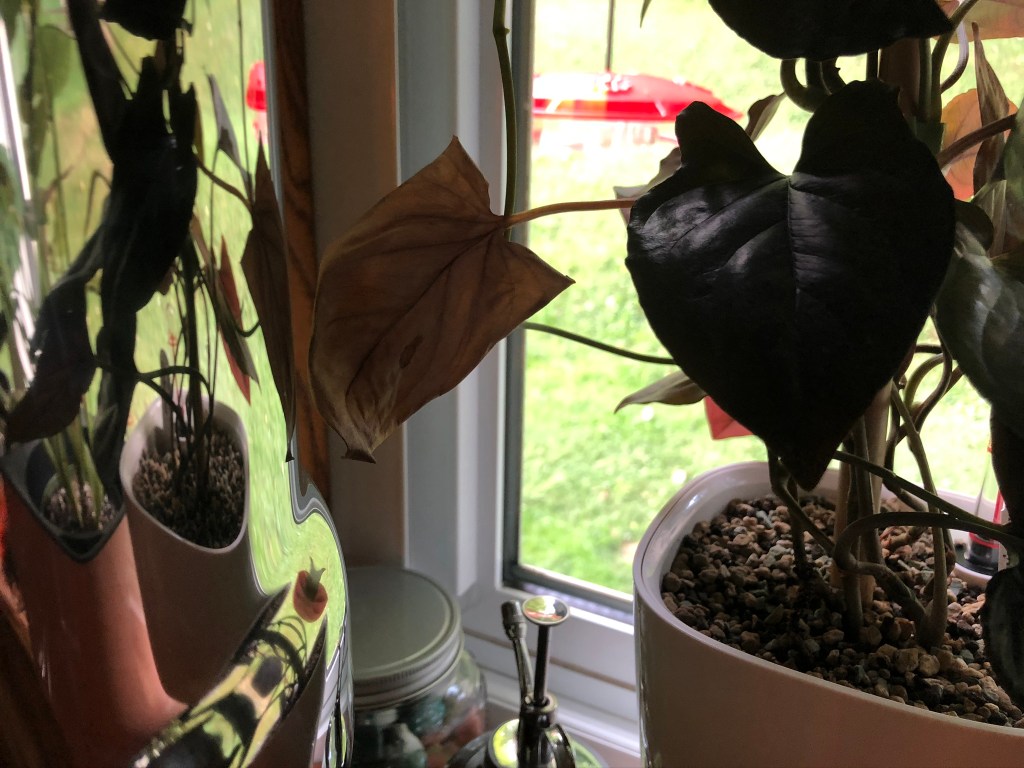
Syngonium erythrophyllum ‘Llano Carti Road’ with a brown/pink dying leaf
Philodendron ‘Florida Beauty’ with a bright yellow leaf hiding in the back
So many yellow leaves…
The photos above are just a few of many, many yellow leaves that popped up around my home.
These random yellow leaves are nothing to worry about, my friends. If you have plants that are shedding a few leaves as we transition from summer heat into cooler temps, that is a completely normal behavior for your plant. Do not panic. Just allow your plant to take any energy left in the leaf and as soon as it can be removed easily, put it on your compost pile.
Now that I’ve revealed to you the results of my plant neglect, I hope you all still love me. And remember to love yourselves too. Especially if you have a few yellow leaves on your plants too.
Also remember to follow me on YouTube (Liquidambar Girl Gardening) and on Instagram @liquidambar_girl. All of your follows and likes really help me keep providing y’all with planty information. It’d also be great if you’d take a second and follow this blog by subscribing and liking this post. I really appreciate it!
If you’d like to see this blog in a video format, check out my YouTube video about all of my yellow leaves.
Epiphyllum are known as some of the easiest houseplants you could ever dream of growing. But maybe you are new in your plant parenthood journey or just new to the genus and have some questions. Hopefully, this article will give you some guidance. We will discuss; watering, light, best location in the house, temperature, fertilizer, humidity, flowers, insects, diseases, pruning, propagation and toxicity.
The blooms on orchid cacti are a real attraction for plant collectors. They are large and showy and many of them are deliciously scented as a bonus. It can be difficult to bring epiphyllum into bloom which (I think) offers plant parents the attraction of a challenge and adds an allure to owning this type of houseplant. Let’s face it, if you have epiphyllum blooms to show off on your Instagram, well, that’s a serious “flex” on your plant parenting skills.
This plant has many synonyms including Orchid Cactus, Queen of the Night, Princess of the Night, Christ in the Manger, Epiphytic Cactus and others. For now I will refer to this plant as Night Blooming Cereus or even just NBC.
The name Night Blooming Cereus is used for several genera of plants that are all very similar in physical structure, bloom type and fruit type. The most common ones are Epiphyllum oxypetalum, Hylocereus undatus (Dragon fruit), Peniocereus greggii and Selenicereus grandiflorus. Soooooo…that’s a bit confusing. I personally try to not purchase any plant marked as NBC unless it also has a botanical name included. But that’s just me and my weird hang-ups, you can purchase any NBC that you like.
Since there are different genera represented under the umbrella title of Night Blooming Cereus, it isn’t surprising to know that the plants do differ from each other slightly. For example, the blooms on an NBC can be creamy white, yellowish white, pinkish white or a pure snowy white. Unfortunately, you won’t know right away what color of blooms your plant will produce for a few years unless you have seen the parent plant or if you have purchased from a reputable seller.
Night Blooming Cereus has a rather unorthodox growth pattern that can give it an untidy appearance.
Let’s talk about how to care for this plant.
Watering – Water deeply but only once the soil has dried out in the pot. Using a finger to check the moisture level is a must. I make sure that the potting mix is dried out down several inches before I even consider watering. Also, a drainage hole in the planter is a must. Make sure to provide it a fast-draining potting mix and let all excess water drain out of the pot after watering.
Once you have a plant that is 3-5 years old or older, you can encourage blooms by totally restricting water from November through March. This should also coincide with the lowered winter temperatures (see Temperature requirements). Once you can see flower buds forming on your NBC, resume regular watering.
Light requirements – Bright light is a must for this plant. Too much direct sun can burn those big, beautiful leaves though, so only a few hours of direct sunlight is best.
Best Location in the House – Place your Night Blooming Cereus directly in an East or West facing window and it will love you forever.
Temperature requirements – Like most houseplants, the Night Blooming Cereus will live happily in the same temperatures that we humans like to live in. It can tolerate cold temperatures, but I don’t advise leaving it out in any temperatures below 40 degrees Fahrenheit.
Temperatures also play a very important role in encouraging blooms for this type of Epiphyllum. Night Blooming Cereus will generally refuse to bloom without a “winter chill period”. To recreate this “chill period” in our homes, we must give this plant night time temperatures that fall in somewhere between 35 and 60 degrees (Fahrenheit) for the winter months (preferably from November to March).
Fertilizer – Dilute fertilizer by half. Apply fertilizer during Spring and Summer and straight into Fall as a general guideline. In the Winter, watering should slow or stop completely (depending on the age of your NBC) so no fertilizer throughout the Winter.
Humidity – Normal household humidity levels are completely appropriate. Night Blooming Cereus is also very tolerant of lower humidity levels, so it’s a great choice for plant parents who don’t keep a humidifier in the house.
Flowers – The Night Blooming Cereus has some of the largest and most dramatic flowers in the houseplant world. Think cactus flowers except even bigger. They are several inches across (some describe them as dinner plate sized), open only at night and have a wonderfully intoxicating scent. That being said, they aren’t terribly easy to bring into bloom especially if you aren’t an experienced plant parent.
Night blooming cereus will not bloom as new plants, they most likely will bloom for the first time somewhere between the ages of 3 and 5 years old. Once you have a plant that is aged 3-5 years, you can modify your watering and temperatures in the winter to encourage your plant to give you those fantastic blooms. (See the Watering and Temperature requirements sections of this article.)
You may have noticed that there is no picture of NBC blooms here. I haven’t put up any pictures of blooms because my plants haven’t given me any blooms yet. My oldest NBC plant is four years old this year and so could potentially give me blooms. It almost certainly won’t because I didn’t really give it low enough temps over the past winter and so I don’t expect to see any blooms this year. When I get blooms, I’ll certainly do a blog and I’ll update this post with a photo too. And I’ll most likely do an Instagram “flex” post too. Teehee.
Insects – Mealy bugs appear to be the most common insect complaint for this plant. Aphids, scale and mites are also a potential threat. I have not had pests on any of my Epiphyllum plants (I’m knocking on wood right now!) which leads me to believe that they are not terribly insect prone.
Diseases – In general, Epiphyllum don’t seem to suffer from many diseases. Soil that holds too much water will be the cause of the diseases you may encounter about 90% of the time. Most commonly those diseases are root rot or fungal leaf spot (see photo below) which can be dangerous to your plant’s overall health.
I’ve been dealing with a bit of Fungal Leaf Spot on one of my NBC plants.
Pruning – The NBC can have crazy and sometimes awkward looking growth patterns. If your plant is growing in an unattractive habit, simply cut away any weird growth. It won’t bother your plant at all. Do take into consideration that the oldest leaves on your plant will be the first ones to bloom. You may not want to cut those more mature stems if blooms are one of your goals.
Propagation – Night blooming Cereus is really easy to propagate, which is lovely. I simply take cuttings. You could also use water to propagate cuttings, or even LECA if that’s your jam. I use soil. I recommend that you do whatever works for you. I’ve never lost a single NBC cutting using soil, so that’s the method I’ll continue using. But again, use whatever method works best for you.
Toxicity – According to the ASPCA, the NBC is non-toxic to cats and dogs. I’ll include a link to the ASPCA site if you’d like to look for yourself. I would also like to caution you that if you have a young child or pet that is interested in touching or chewing on your plants, the NBC can still be a choking hazard just due to the tough texture of its leaves/stems. So if you have a curious pet or child in the home, it’s best to keep your NBC out of their reach.
Link to my Etsy shop, Matilda and Clementine which often (but not always) has rooted Night Blooming Cereus cuttings available.
If this article was helpful to you, make sure to follow this blog. Simply head to the bottom of the Home page of this website, click the Subscribe button and type in your email address. Sharing and liking these articles is also very helpful to us. Thanks for reading!
Haworthias are one of my favorite genus of houseplants. I appreciate that the charms of Haworthias aren’t obvious or flashy like some other succulent houseplants, the Echeverias for example. These are simple plants that are difficult to kill which makes them perfect for new plant parents.
If you are new to Haworthias or have struggled with caring for this plant in the past, this article should give you some guidance. We will discuss; watering, light, best location in the house, temperature, fertilizer, humidity, flowers, insects, diseases, pruning, propagation and toxicity.
Haworthia tessellata has several synomyns including Haworthiopsis venosa ssp. tesselata, Haworthia venosa ssp. tessellata, Haworthiopsis tesselata, Alligator Plant, and Veined Haworthia.
Haworthia venosa ssp. tessellata
Many Haworthias have actually been reclassified as Haworthiopsis including the Haworthia tessellata. So it’s new officially correct name is Haworthiopsis venosa ssp. tessellata. To me the genus name, Haworthiopsis, is completely awkward and confusing. But no one asked for my opinion on the matter. So…
Watering – Water deeply but only once the soil has dried out in the pot. Using a finger to check the moisture level is a must. I make sure that the potting mix is dried out down several inches before I even consider watering. Also, a drainage hole in the planter is a must. Make sure to provide it a fast-draining potting mix and let all excess water drain out of the pot after watering.
It is important to slow down watering this plant during the hottest parts of summer. Haworthias will slow or stop growing during the summer and therefore do not require much water. Be sure to slow or stop watering during this time to prevent root rot.
Light requirements – Medium light is all that is needed for this plant. Direct sun will burn a Haworthia’s leaves. You will know the appropriateness of your light levels just based on the coloration of the leaves. H. tesselata will be green in low/medium light and brown/red in medium/bright light. Direct sunlight is not recommended.
Best Location in the House – Place H. tessellata directly in a North facing window and it will love you forever. If you don’t have a North window in your home, place it a few feet back from an East or West facing window (3-4 feet should be appropriate).
Temperature requirements – Like most houseplants, this Haworthia will live happily in the same temperatures that we humans like to live in. It is natural for Haworthias to “shut down”, so to speak, in the heat of summer. During this shut down they slow down or completely stop growing which helps them endure the oppressive heat of South Africa in summer.
Fertilizer – Dilute fertilizer by half. Apply fertilizer beginning in March as a general guideline. I personally use fertilizer in Spring and Fall, taking a rest from fertilizer in the Summer.
Humidity – Normal household humidity levels are completely appropriate. However, if you own other houseplants that require higher humidity (like I do) and have humidifiers running in your house for those other plants, I would not personally recommend keeping your H. tessellata too close to the humidifier. The more humid its environment, the slower its potting mix will dry out – which can cause root rot.
Flowers – This Haworthia can flower when it’s happy. You will know blooms are coming if you see extremely long stems shoot up from the center of the plant in the Summer. The flowers are just like other Haworthia plants, tiny cylindrical white and green flowers on top of extremely long stems.
Insects – I’ve kept Haworthias for many years now and I’ve never, not once, had pest issues with any of them. I don’t think this is luck because I’ve had many pest issues with other succulent plants. The insects just don’t find Haworthia plants attractive, which makes these basically the perfect houseplants (in my very humble opinion.)
Diseases – The Haworthia genus doesn’t seem to suffer many diseases. If you have lost a Haworthia, it is almost certainly because of root rot.
Pruning – I do not advise pruning your Haworthia. If your Haworthia has a leaf that has died, simply wait for the leaf to dry out completely and pull if off with just your hand. No other pruning is necessary.
Propagation – Haworthia plants do the propagating for us, so that’s nice and easy. They produce offsets or pups which will eventually grow into full sized plants. I prefer to allow Haworthia pups to grow to a decent size before separating them from the parent plant, but that’s a personal preference. Really the only requirement for separating is to make sure that the offset has some roots so that it can survive on its own.
Toxicity – Haworthia plants are non toxic for your dogs, cats and for humans. Animals in Namibia and South Africa search for Haworthia plants which they eat. But they aren’t really eating them for food. They use these plants as a source of water. I love that. Also, that is why many of the Haworthias (including Haworthia tessellata) have those famous “windows” on the tops of their leaves. They have to hide down in the soil to protect themselves from thirsty elephants.
I do want to point out that just because the plant parts of Haworthias are not poisonous for children or animals, they could still potentially be a choking hazard. So if you have a curious child or an animal that enjoys chewing on your houseplants living with you, you should still keep this plant out of reach.
Link to my Etsy shop, Matilda and Clementine which often (but not always) has Haworthia tessellata plants available.
If this article was helpful to you, make sure to follow this blog. Simply head to the bottom of the Home page of this website, click the Subscribe button and type in your email address. Sharing and liking these articles is also very helpful to us. Thanks for reading!
Mercy, peace and love be multiplied to you.
Products I use and (therefore) recommend:
Planty friends – Feel free to use these links to the products that I use for my houseplants. I receive a small percentage of any sales through these links, so feel free not to use them if that bothers you.
Full disclosure – the last four product links will be much cheaper if you can find them in your local garden center. I’ve put them here so that you can see what they are called and what they look like, but I’d advise that you buy from these links only as a last resort.
I have been on a bit of a planter buying kick recently. I keep seeing all these amazing handmade pots on Plantstagram and I want one of each. After all, we spend so much time and money growing beautiful plants, it makes sense that we want to display those plants in beautiful pots. I have a few new planters that I’m excited to show you.
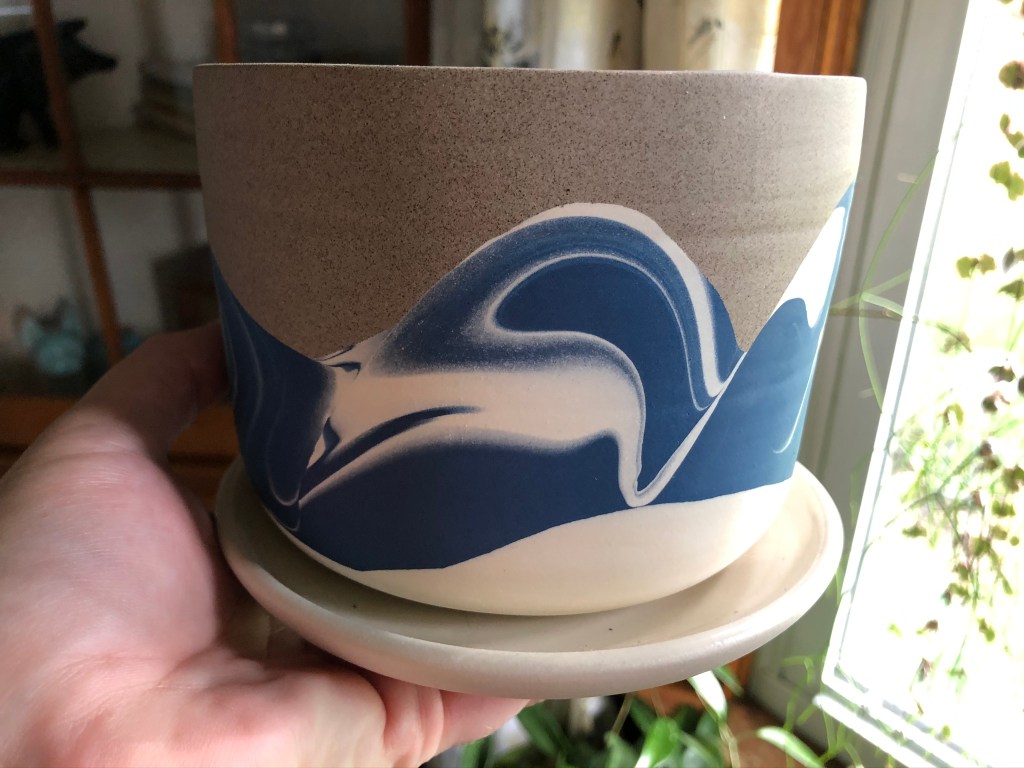
Let’s begin with this beauty made by Helen Levi.
I keep my huge Hoya pubicalyx in this planter, but it’s such a crazy grower I had to take it out so that you could see the pot.
Helen throws these planters and many other pottery products in her studio in Brooklyn, New York. Here is a link to her website.
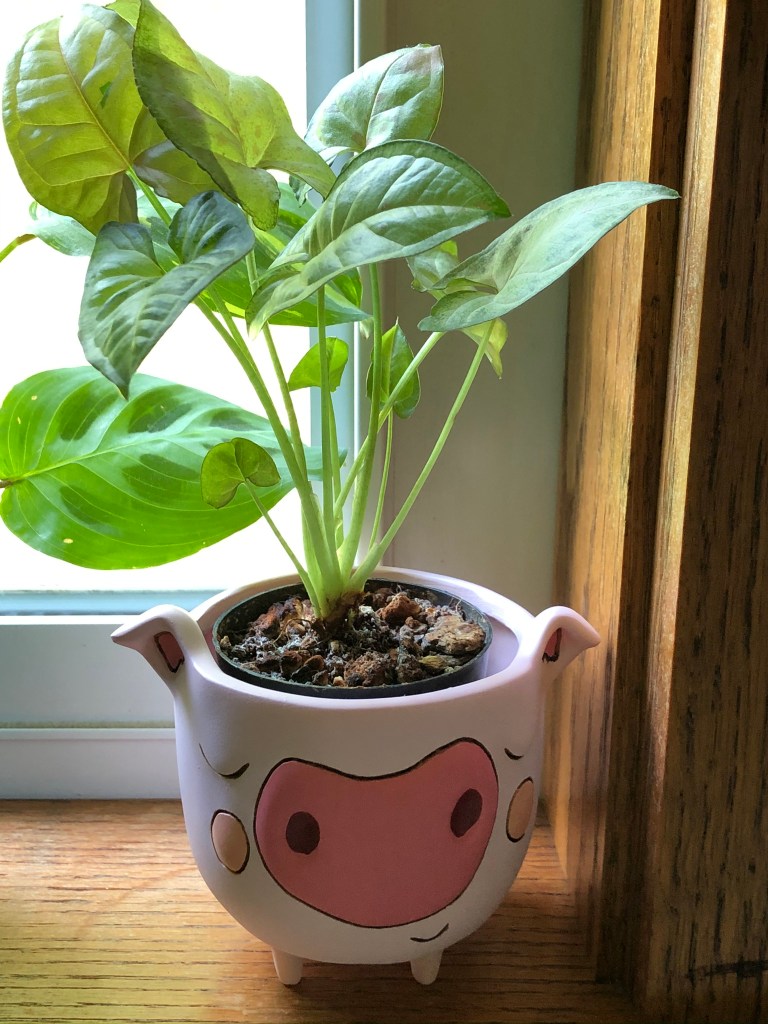
This next artist brings joy and whimsy to your plant collection. Her name is Michelle Allen and I can’t get enough of her planters.
A tiny Syngonium ‘Confetti’ in my Piggy planter
I want to let you know that these planters are Michelle Allen’s designs, but are made from resin. She then hand paints them before shipping them to you. I like the resin planters. They are much more lightweight than heavy ceramics or terra cotta. I really appreciate that Michelle sends each planter with a plastic stopper in the drain hole so that you can choose to plant your houseplant directly in the planter or as I generally do, you can keep your plant in its plastic nursery pot inside another (decorative) cache pot. Here is a link to Michelle Allen’s website.
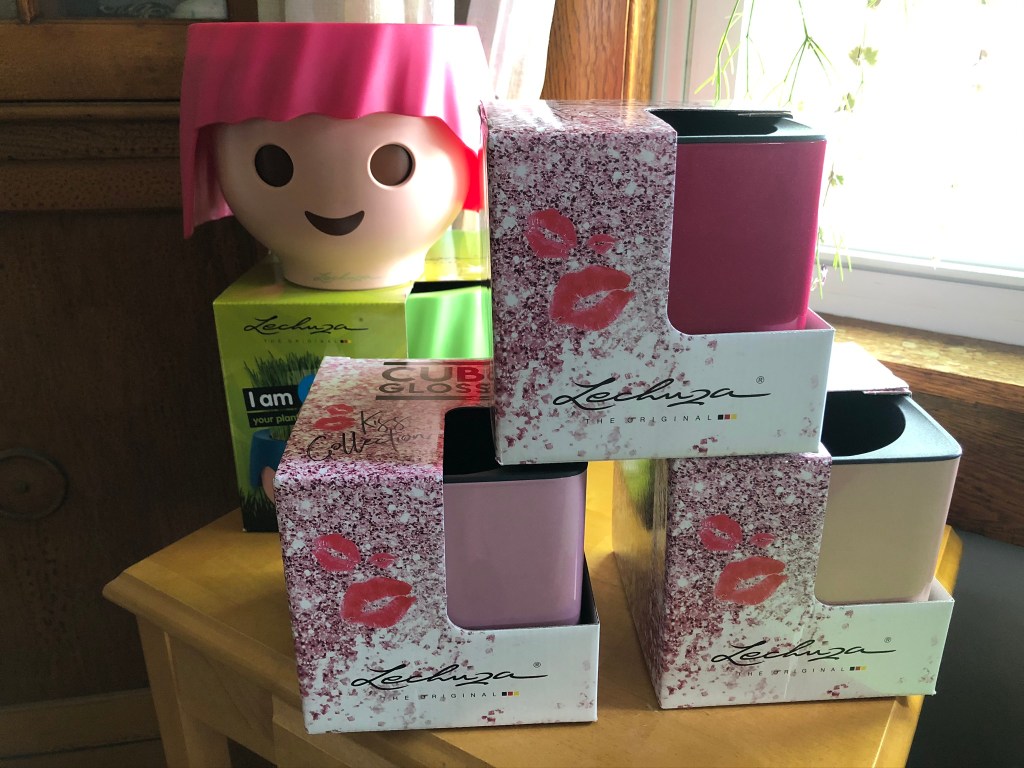
The next planters that I’m currently loving are not handmade or ceramic. Instead they are the plastic planters made by the Lechuza company.
I’ll just say it, I’m all in with the Lechuza self-watering planters. They are keeping my houseplants really happy. As you may already know, I wanted to start using these planters just for my more “thirsty” plants so that I could keep them alive. (I freely admit to being an inconsistent plant waterer.) But the self-watering planters have been so successful that I’ve branched out and begun using them for plants that I hadn’t originally planned to use. Like my beloved Hoyas, for instance. Besides the wonderful growing results these planters have given me, they are also have many different styles and designs so that you can easily find some that fit in with your aesthetic. Here is a link to the Cube planter by Lechuza. If you are interested in the Playmobil head planters (called “Ojo”) here is a link to the Lechuza website.
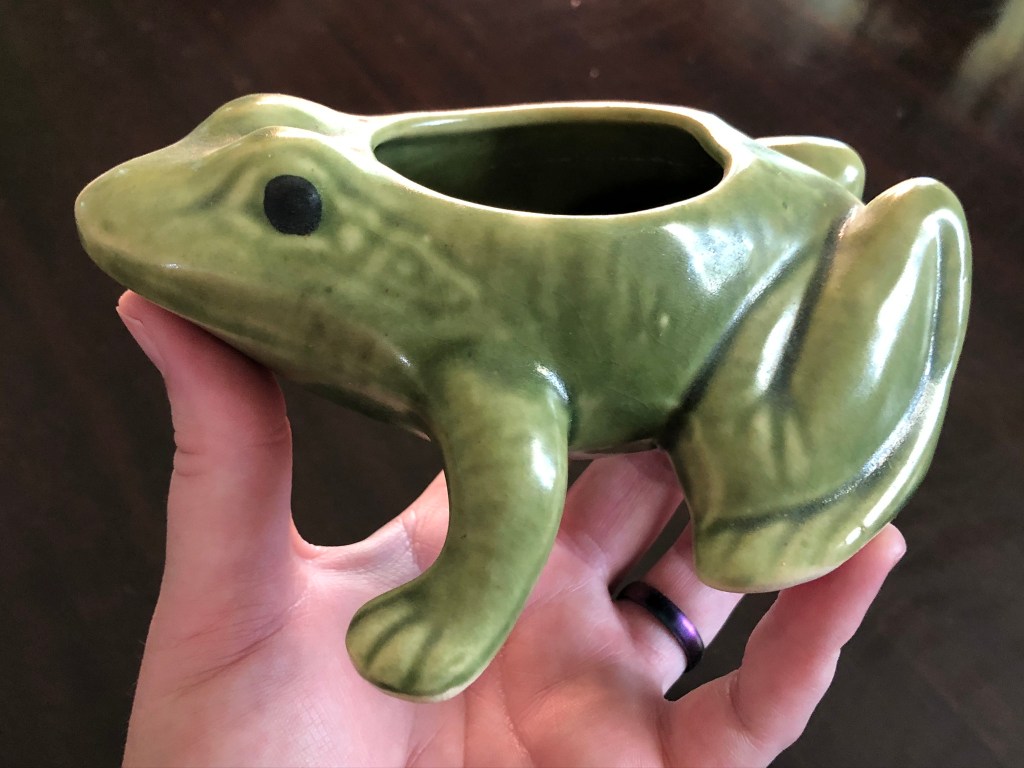
The last planters on my list are not new at all. Lately, I’ve been searching Ebay for planters made by the McCoy company. This little succulent planter is most likely from the 1950’s.
The McCoy company had its factory just a few miles from where I live in Ohio. When I discovered a few years ago that this company made many different planter designs including small animal planters, I was delighted. The animal planters they produced are mostly small and surprisingly detailed. They’re perfect for my succulent plants. Sadly, I cannot give you a link for the McCoy company because they have been out of business for decades. But if you like to shop for antiques you could likely find some of these pretty pots. Also I shop on Ebay if I’m looking for a particular size or style of pot by the McCoy pottery company.
I hope you are all doing well! Take care and love each other.
If you enjoyed this blog, make sure to subscribe to our website. Simply go to the Homepage, scroll to the bottom of the page and click the subscribe button.
If you’d like to watch a video showing my newest Lechuza planters in more detail, watch our YouTube video New Lechuza Planters.
If you’d like to see me planting Zigzag Cactus (Epiphyllum anguliger) in my newest Lechuza planter, you can watch my story highlights on Instagram – liquidambar_girl.
Growing my beloved houseplants in alternative potting mixes was not something I’d ever really considered. For years, I have enjoyed mixing up ingredients to create the perfect potting mixes for each of my plants. But I always shied away from using “soil-less” growing media. Until I started slowly killing my second Monstera adansonii with chronic inconsistent watering…
Full disclosure, this was not a scientific experiment in any way. I had a few differences in variables which I will explain in a bit. But first, why don’t I show you the comparison photo?
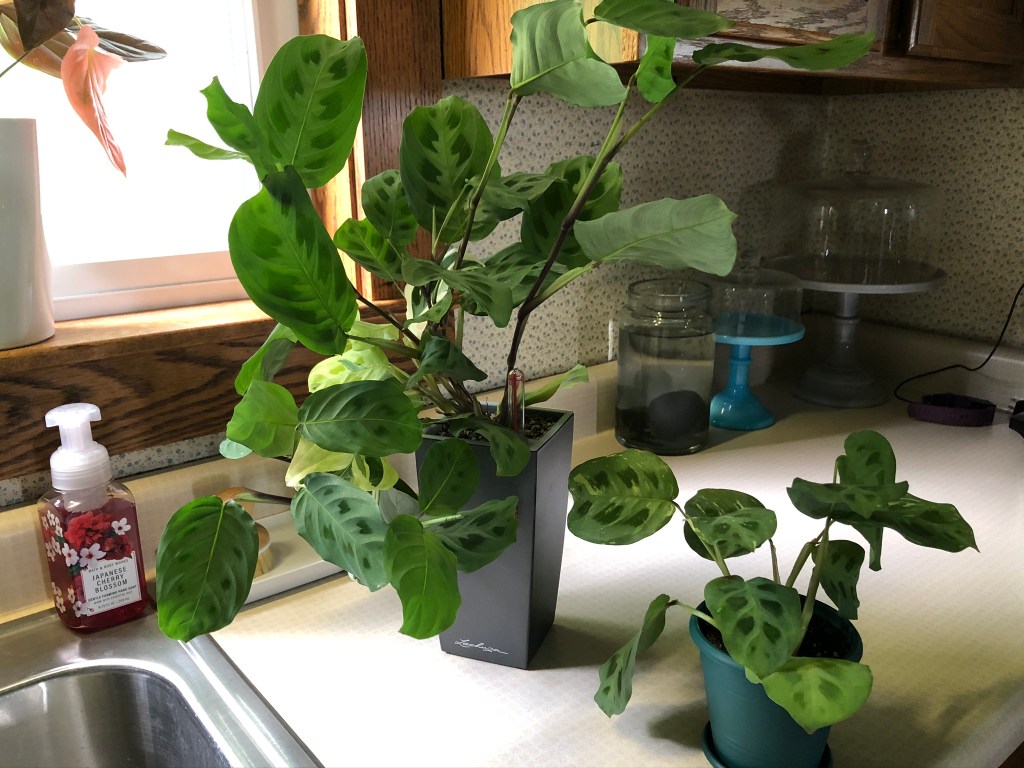
These two Marantas were the same size three months ago.
So let me explain my little experiment. I started with two Marantas of the same size. They started in identical sized pots. Both Marantas have variegation; one has a section of almost pure white leaves while the rest of that plant is completely unvariegated, the other plant has a little bit of variegation on all of its leaves. So, already, this experiment is flawed in that the plants are somewhat dissimilar.
I removed as much of the soil as possible from one plant and repotted it in a Lechuza planter using a completely soil-less potting mix called “pon”. Lechuza pon to be exact. It is produced by the same company that makes the planters I am currently obsessing over. The other (poor) plant stayed in the pot it came in with no changes of potting mix or pot size. So, again, not perfect experiment parameters since both plants should have been repotted into the same pot but with different soil media. Oh well.
Despite my lack of scientific method I do believe that my results show that the Lechuza pon is a great alternative to a more traditional potting mix. And if you are an inconsistent waterer, like I am, then the Lechuza self-watering planters are an excellent way to correct that issue.
It seems like that has been the question I have been attempting to answer around here. The only indoor plants I have purchased in the last six months have been Hoyas. No exceptions that I can remember. I guess Hoyas are my new favorites. Gone are the days when I was happy bringing in a new Peperomia with their tiny pots and tidy growth habits. For some reason, I’ve grown an attachment to Hoyas, most of which grow into monster sized plants requiring either hanging planters or trellising systems. (Insert a quiet sigh.) Why, why, why?
Really though, there is no reason to question my love for these plants. Have you seen their blooms? Have you smelled their blooms? And that gorgeous foliage…they’re beautiful even if they choose to never bloom. The Hoyas chose me. And in addition to all those wonderful qualities there’s the fact that Hoyas thrive under my growing style. I like to call it benign neglect. That’s a euphemism for, “I water my plants when I have time to. Which is never.” What can I say, my friends, I’m a busy girl. But my Hoyas just love it. No over watering to worry about in my household.
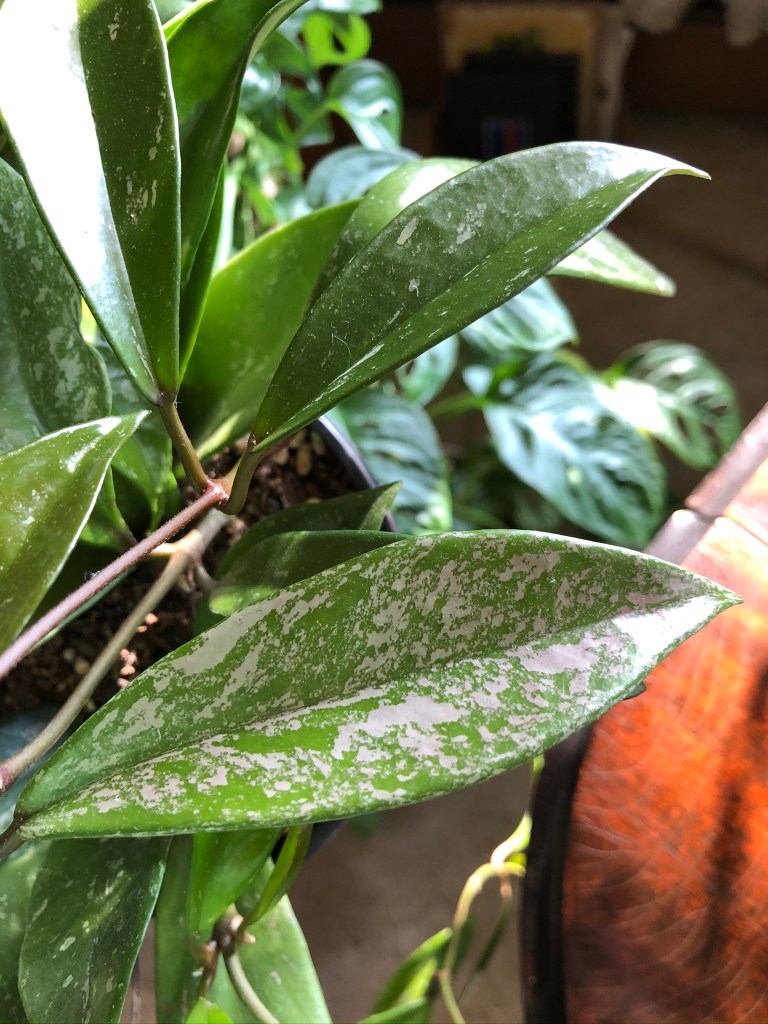
Hoya pubicalyx ‘Royal Hawaiian Purple’ with pink splashes on the leaves.
So just how many Hoya plants do I currently own you ask? Hmmm…let me just do a walk around my house and count…twenty-five. I have twenty-five Hoya plants in my house. That seems a little bit excessive to me. What do you think? The number of actual different species/cultivars of Hoyas I own is twenty-one because I own doubles of a couple of plants. Originally, I bought those extras so that I could pot two plants into a single pot and have fuller looking plants. And I may still do that. Or those extras may have to be sold on my Etsy shop. I haven’t decided for sure what I want to do with them.
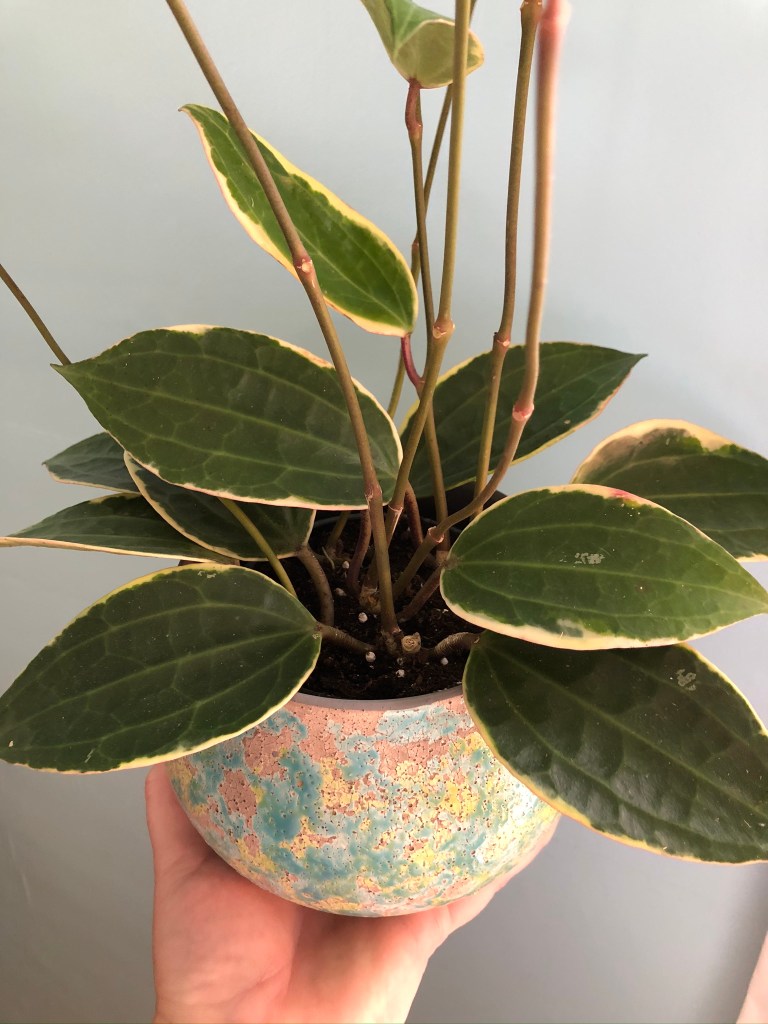
Hoya macrophylla albo marginata; one of my favorites.
Thankfully, most of the Hoya plants that I currently own are not huge mature plants. Many of them are small, living in 3″ or 4″ pots. But what are they going to look like in a few years? That’s the thought that is haunting me right now. The growth on some of these plants is lightening fast. My Hoya obovata for example has put on three new leaves in the matter of a couple of weeks. The leaves are fully sized already and the next leaf pair has already formed. I think I may be in some serious trouble here.
Some of my Hoyas enjoying life under the grow lights.
Just for posterity, let me put out a list of my current Hoyas and that way we’ll see how that number changes in the future. Here we go…
I’d love to know your favorite Hoyas. Comment below if you’d be kind enough to share that with me. I’d also love to know which Hoyas I don’t have, but you think I should buy and also which Hoyas you have owned but really dislike. I’m really curious to know your thoughts!
If you’d like to see this in a video form, click here to watch my video on YouTube.
Thanks so much for reading. Don’t forget to subscribe to this webpage so you can see an update when I post new content.
If you are looking for a Mother’s Day gift for a special gardener in your life, this blog is for you. I’ve included links below to give you an idea of what is out there. Also, I’ll try and list these from least expensive to most expensive. Hopefully you’ll find that to be helpful…
#10 – Cooling Towels – It may not seem like much, but working in sweltering summer heat can cause some serious stress on the body. Cooling towels are a wonderful relief and can actually bring the body temperature down and continue to cool down the body for quite a while. I use them around my neck but they can also be tied around the forehead too. They generally come in a package with multiple towels which is great since they will need to be laundered after use and gardeners are generally out in their gardens daily. Here is a link to cooling towels so you can have a look. There are tons of different companies out there so find something that looks good for your gardener.
#9 – Knee Pads – Another gift that is aimed at giving comfort to your beloved gardener is knee pads. Now, many would go with a kneeling pad as a gift which is perfectly fine. But personally I’m a gardener who just can’t use kneeling pads. Every time I have tried a kneeling pad it has been an exercise in frustration. I move a few inches and have to stop and adjust it. That quickly ends with me leaving it behind and tearing up my kneecaps instead. Knee pads move with you. Everywhere. And they offer more appropriate support to the kneecap (in my experience, kneeling pads can actually cause knee pain because of the hardness of the material). I believe that these would make a very thoughtful Mother’s Day gift.
#8 – Garden Obelisk – Flower gardens and vegetable gardens can both benefit from the addition of an obelisk. Beans or tomatoes looks so much nicer in a vegetable garden with an obelisk to keep their growth neat and tidy. And any climbing flower (Clematis or vining Black-Eyed Susan) brings drama to the flower garden when given its own obelisk. Price wise, I have placed this item at #8 on our countdown because you can buy obelisks at basically every price range. The one I have linked is the cheapest one I could find, but you can go up in price depending on how fancy and how big of an obelisk you’d like to give to your gardener.
#7 – Bee House – This is a gift for your gardener and for Mother Nature. Native bees are always needing a little bit of shelter and a bee house is just what they are looking for. There are many different shapes and sizes of bee houses which makes it easy to find something that will compliment your garden. As an added bonus, native bees will be buzzing around pollinating all of your flowers, herbs, fruits and/or vegetables.
#6 – A Gardening Book – There are so many great books out there for gardeners. Some focusing on organic gardening, or pests and diseases or even others showing different varieties and cultivars of plants. One of my favorite types of gardening books are the ones with huge photos where I can find inspiration for my own garden. Here are a couple of my favorites…
#5 – Concrete Garden Décor Pieces – Again, concrete pieces for the garden can vary greatly in price, mostly depending on the size of the piece. Smaller pieces can be quite affordable if your budget is tight and can bring a sense of charm and whimsy to your garden space. Conversely, if you really want to pack a punch with your Mother’s Day gift, a new bird bath or fountain can bring some serious drama to the garden.
#4 – A Kangaroo Bag – These are mighty handy to have in a flower or vegetable garden. We gardeners are always looking for some way to collect and transport our cuttings and other garden waste and a Kangaroo Bag is seriously “the bee’s knees”. They have a hard plastic bottom to protect them from ripping or tearing. They can take such a beating. I actually use these in the vineyard to transport my cuttings which are so destructive. I have tears and scratches on/in everything I use…except my Kangaroo bag.
#3 – Felco Hand Pruners (#6) – Outdoor gardening requires cutting tools and Felco hand pruners are the Cadillac of hand pruners. There really is no comparison. I use hand pruners daily for my job and I have used every brand out there. My Felco hand pruners make each cut more effortless and protect my hands from fatigue. There are several different models and I have suggested the #6 since it is designed for people with smaller hands. If your gardener needs hand pruners for branches that are generally thicker than 1/2″, I would suggest the Felco #2 pruners instead.
#2 – A Garden Cart – The ability to move all of my tools and fertilizers and things around my garden so they are right where I need them…well…it’s Xanadu. Once again, there are many varieties and sizes of garden carts out there. I chose this garden cart for a couple of reasons. It is solid and can hold dirt or leaves or cuttings or whatever I need to move around with. I also really appreciate that it can dump the contents out if I need to. Many other carts do not have that option. This third reason that I like this cart in particular is that it sits a lot higher than others I have used. Since I am pretty tall I appreciate the added height.
#1 – A Tree – Maybe I’m oversimplifying things here, but what better gift can you think of than a tree? Our planet is in desperate need of more planted trees and every garden, big or tiny has room for a tree. You just need to go into a garden center and find a tree that is the appropriate size. If you are new to tree buying, let me give you a piece of advice. Choose a tree based on its fully mature size, not what it looks like in the garden center right now. Some trees come in looking tiny and cute and end up at 50 feet tall with a 30 foot canopy. If you decide on gifting a tree for Mother’s Day, make sure that you take a photo of your child/children/grandchildren in front of the new tree. Maybe it can even become a yearly tradition, following the growth and maturity of the children compared to the tree.
I hope this inspires you if you need some inspiration. I hope that you are all staying healthy out there. And I wish you all a Happy Mother’s Day.
Lastly, I would like to remember that not all people are able to enjoy Mother’s Day and I want to remember you here too. I’m sure there are some here who have lost a child or a pregnancy. Maybe your relationship with your parents is strained or severed. Many have lost their parents or never had the chance to know them. Whatever your situation, I hope that you can have the best May the 10th as is possible this year. You are in my prayers.
Some or all of the links in this article may be affiliate links.
Before I begin, I apologize for a blog that isn’t directly related to plants. It is tangentially related to plants though so I’m hoping you’ll give me a bit of leeway, dear Reader.
Like everyone else, I assume, I’m listening to loads of NPR and in between the updates on coronavirus death tolls I am hearing a lot about climate change which brings me to the topic of this blog. You see, my family and I have made quite a few changes to our daily life in order to reduce our carbon footprint.
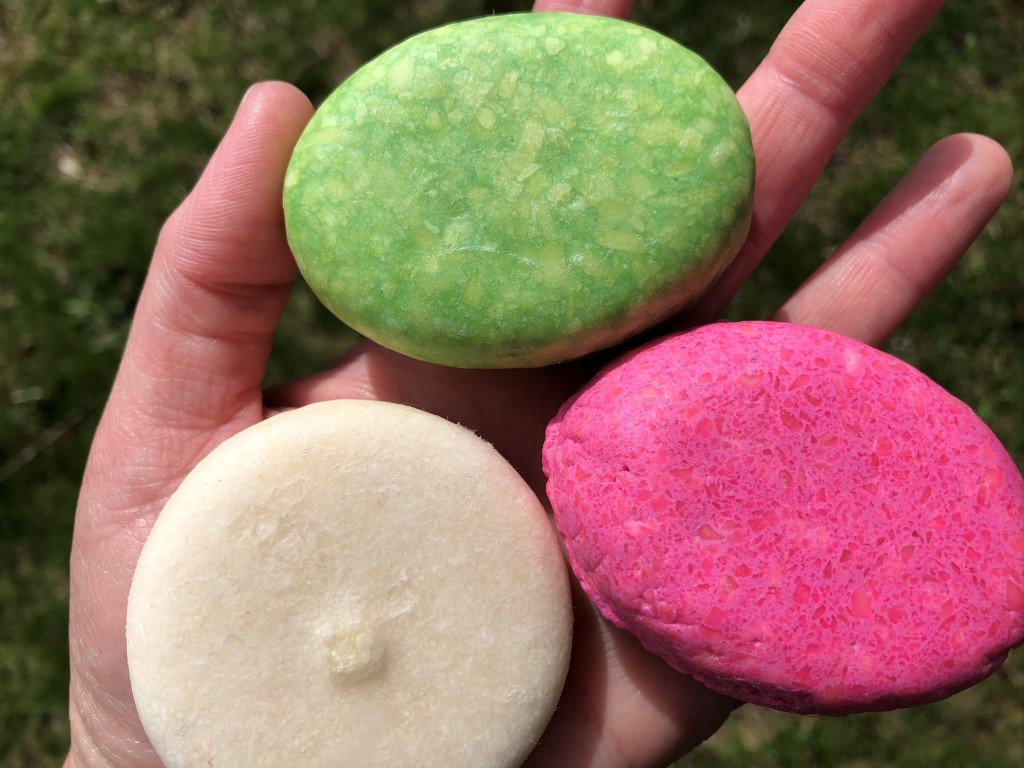
One of those changes is switching to zero waste products when we can. The product I want to speak about specifically today is zero waste shampoo and conditioner. If you’re like I was when first discovering this product, you’re probably asking yourself, “What does zero waste shampoo even look like?” Let me show you.
The cream colored bar is my shampoo and I switch between the two conditioner bars (green & pink).
I was really skeptical about making this change to my haircare routine. Thinking back, I don’t think I’ve made any drastic changes to that routine in my entire adult life. But I feel very obligated to force myself to try new (to me) things if those changes can benefit our planet.
I am delighted to say that the zero waste shampoo has been beyond successful. I feel like my hair has never looked or felt better. As an added bonus, I am crazy about the scents of these shampoos and conditioners. I actually look forward to hair washing days.
I have been using these products for 6 months as I write this blog. It did actually take a little bit of time to adjust. It took me about two weeks to get used to using bars instead of traditional shampoo. It was really just a matter of figuring out how much product to use.
One other adjustment has been the storage of the shampoo/conditioner bars. Obviously, they aren’t supposed to be left under the shower nozzle as they will just dissolve and melt away. Also, they should be allowed to dry out in between uses. I originally bought some metal tins to store the bars in, but have since changed to a soap dish. Which after all has been designed to extend the life of a bar of soap and works perfectly for a bar of shampoo or conditioner.
I’m sure there are many brands of zero waste or low waste shampoos available. But in case you were wondering what brand I am so smitten with, the company is called Lush Cosmetics. It’s that really powerfully smelling store in the mall. The one I used to avoid at all costs because I am not a lover of powerful scents. That has all changed for me. I now realize that this company has put a lot of effort into making products that are low or no carbon footprint and high quality. I recommend them very highly. And now my family of four is no longer contributing to the plastic waste problem. Of course, you can recycle, but that process itself contributes to the microplastics that are permeating our atmosphere. Why use plastic at all? Especially when the zero waste alternative is so lovely.
I want to end this by saying that I don’t in any way mean for this blog to come off as “judgy”. I only wish to make you aware of a very small (to me and you) change that can translate into a larger and more powerful change for our planet. Just think about how many bottles of shampoo and conditioner are in your shower right now. And then there are shower gels and face washes and such. And how many times a year do you buy new ones? That adds up frighteningly quickly, my friends.
My family and I have been making many small changes over the years. I have found that small changes are much more successful in our family than large and drastic ones. But as I look back, those small changes have grown quite large when added to together. And that’s something that I’m proud of.
Please feel free to ask me questions below. And make sure to like this article if you found it interesting or (hopefully) inspiring. I hope you are all staying healthy physically and mentally during this scary situation.